The Forms Library is a library of C-routines that allows you to build up interaction forms with buttons, sliders, input fields, dials, etc. in a very simple way. Following the X tradition, Forms Library does not enforce the look and feel of objects although in its default state, it does provide a consistent look and feel for all objects.
The Forms Library only uses the services provided by Xlib and should be compilable
on all machines that have X installed and have an ANSI compatible compiler.
Being based on Xlib, Forms Library is small and efficient.
It can be used in both C and C++ programs and soon it
will be available for other languages.![]()
The basic procedure of using the Forms Library is as follows. First one or
more forms are defined, by indicating what objects should be placed
on them and where. Types of objects that can be placed on the forms
include: boxes, texts, sliders, buttons, dials, input fields and many
more. Even a clock can be placed on a form with one command.
After the form has been defined it is displayed on the screen and
control is given to a library call fl_do_forms(). This routine
takes care of the interaction between the user and the form and returns
as soon as some change occurs in the status of the form due to some
user action. In this case control
is returned to the program (indicating that the object changed) and
the program can take action accordingly, after which control is returned
again to the fl_do_forms() routine. Multiple forms can be handled
simultaneously by the library and can be combined with windows of the
application program. More advanced event handling via object
callbacks is also supported.
The Forms Library is simple to use. Defining a form takes a few lines
of code and interaction is fully handled by the library routines. A
number of demo programs are provided to show how to piece together
various parts of the library and demonstrate how easy forms are
built and used. They can be found in the directory
xforms/DEMOS. Studying these demos is a good way of learning
the system.
If you only have very simple applications for the Forms Library, e.g., to ask the user for a file name, or ask him a question or give him a short message, chapter 6 contains some even more simple routines for this. So, e.g., a form with the question: Do you want to quit can be made with one line of code.
To make designing forms even easier a Form Designer is provided. As its name implies, this is a program that lets you interactively design forms and generate the corresponding C-code. See Part ii for its use.
The current version of the software is already quite extended but we are working on further improvements. In particular, we plan on designing new classes of objects that can be placed on the forms. Adding classes to the system is not very complicated. Part four of this document describes in detail how to do this yourself.
The following chapters will describe the basic application programmer's interface to the Forms Library and lead you through the different aspects of designing and using forms. In chapter 2 we give some small and easy examples of the design and use of forms. In chapter 3 we describe how to define forms. This chapter just contains the basic classes of objects that can be placed on forms. Also, for some classes only the basic types are described and not all. For an overview of all classes and types of objects see Part iii of this document. Chapter 4 describes how to set up interaction with forms. A very specific class of objects are free objects and canvases. The application program has full control over their appearance and interaction. They can be used to place anything on forms that is not supported by the standard objects. Chapter 5 describes their use. Finally chapter 6 describes some built-in routines for simple interaction like asking questions and prompting for choices etc.
The names of all Forms Library functions and user-accessible data structures
begin with fl_ or FL_, and use an ``underscore-between-words''
convention, that is when function and variable names are composed of more
than one word, an underscore is inserted between each word. For example,
   fl_state
   fl_set_object_label()
   fl_show_form()
All Forms Library macros, constants and types also follow this convention, except that the first two letters are capitalized. For example,
   FL_min()
   FL_NORMAL_BUTTON
   FL_OBJECT
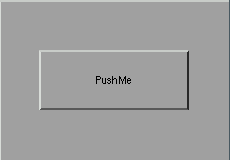
Before using forms for interaction with the user you first have to define them. Next you can display them and perform interaction with them. Both stages are simple. Before explaining all the details let us first look at some examples. A very simple form definition would look as follows:
   FL_FORM *simpleform;

   simpleform = fl_bgn_form(FL_UP_BOX,230,160);
      fl_add_button(FL_NORMAL_BUTTON,40,50,150,60,"Push Me");
   fl_end_form();
The first line indicates the start of the form definition.
simpleform will
later
be used to identify the form. The type of the form is FL_UP_BOX.
This means that the background of the form is a raised box that looks like
it is coming out of the screen (See Fig. 2.1). The form has a
size of 230 by 160 pixels![]() . Next we add a button to the form.
The type of the button is
. Next we add a button to the form.
The type of the button is FL_NORMAL_BUTTON which will be explained
below in detail. It is centered in the form by the virtue of
the button geometry supplied and has as a label "Push Me".
After having defined the form we can display it using the
call
fl_show_form(simpleform,FL_PLACE_MOUSE,FL_NOBORDER,"SimpleForm");
This will show the form on the screen at the mouse position. (The third argument indicates whether the form gets window manager's decoration and the fourth is the window title.)
Next we give the control over the interaction to the Forms Library's main event loop using the call
fl_do_forms(void);
This will handle interaction with the form until you press and release the button with the mouse at which moment control is returned to the program. Now the form can be removed from the screen (and have its associated window destroyed) using
fl_hide_form(simpleform);
The complete program is given in the file demo01.c in the directory
xforms/DEMOS. All demonstration programs can be found in this
directory. Studying them is a good way of learning how the library works.
Compile and run it to see the effect. To compile a program using the Forms Library use the following command or something similar
cc -I../FORMS -O -o demo01 demo01.c -L../FORMS -lforms -lX11 -lm
(Of course you can install the library so that -L../FORMS
and -I../FORMS can be omitted. Contact your systems administrator
or read the Readme file in the directory xforms to see how to
do this.)
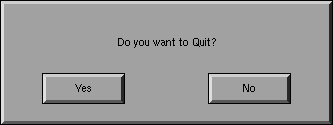
This simple example is, of course, of little use. Let us look at a slightly more complicated one (the program can be found in yesno.c.)
   #include "forms.h"

   FL_FORM *form;
   FL_OBJECT *yes, *no, *but;
   main(int argc, char *argv[])
   {

      fl_initialize(&argc, argv, "FormDemo", 0, 0);
      form = fl_bgn_form(FL_UP_BOX, 320, 120);
        fl_add_box(FL_NO_BOX, 160, 40, 0, 0, "Do you want to Quit?");
        yes = fl_add_button(FL_NORMAL_BUTTON, 40, 70, 80, 30,"Yes");
        no  = fl_add_button(FL_NORMAL_BUTTON, 200, 70, 80, 30,"No");
      fl_end_form();
      fl_show_form(form,FL_PLACE_MOUSE,FL_TRANSIENT,"Question");
      while((but = fl_do_forms()) != yes)
         ;
      fl_hide_form(form);
      return 0;
   }
It creates a form with a simple text and two buttons
(See Fig 2.2). After displaying
the form fl_do_forms() is called. This routine returns
the object being pushed. Simply checking whether this is object yes
determines whether we should quit.
As you see, the program starts by calling the routine
fl_initialize() .
This routine should be called before any other
calls to the library are made (except for
fl_set_defaults() ).
One of the things this routine does is to establish a connection
to the X server and initialize a resource database used
by the X resource manager. It also does many other things, such
as parsing command line options and initializing
internal Forms Library structures. For now, it suffices to know that
by calling this routine, a program automatically recognizes the
following command line options
Note that the executable name argv[0] should not contain
period or *.
See Appendix A for further details.
The above program can in fact be made a lot simpler, using the goodies described in chapter 6. You can simply write:
   while (! fl_show_question("Do you want to Quit?",0))
       ;
It will have exactly the same effect.
The above program only shows one of the event handling methods provided by the library. The direct method of event handling shown above is appropriate for simple programs. For reasonably complicated ones, however, utilizing object callback is strongly encouraged.
We demonstrate the use of object callbacks using the previous example with some modifications so that event processing via callbacks is utilized. It is recommended and also typical of a good XForms application to separate the UI components and the application program itself. Typically the UI components are generated by the bundled GUI builder and the application program consists mostly of callbacks and some glue that combines the UI and the program.
To use callbacks, a typical procedure would be to define all the callback
functions first, then register them with the system
using fl_set_object_callback().
After the form is realized (shown), control is handed to Forms Library's main
loop fl_do_forms(), which responds to user events indefinitely
and never returns .
After modifications are made to utilize object callbacks, the simple question example looks as follows:
   #include "forms.h"

   void yes_callback(FL_OBJECT *ob, long user_data)
   {
       printf("Yes is pushed\n");
       fl_finish();
       exit(0);
   }
   void no_callback(FL_OBJECT *ob, long user_data)
   {
       printf("No is pushed\n");
   }
   FL_FORM *form;
   main(int argc, char *argv[])
   {
      FL_OBJECT *obj;

      fl_initialize(&argc, argv, ,"FormDemo", 0, 0);
      form = fl_bgn_form(FL_UP_BOX, 320, 120);
         fl_add_box(FL_NO_BOX, 160, 40, 0, 0, "Do you want to Quit?");
         obj = fl_add_button(FL_NORMAL_BUTTON, 40, 70, 80, 30,"Yes");
         fl_set_object_callback(obj, yes_callback, 0);
         obj  = fl_add_button(FL_NORMAL_BUTTON, 200, 70, 80, 30,"No");
         fl_set_object_callback(obj, no_callback, 0);
      fl_end_form();
      fl_show_form(form,FL_PLACE_MOUSE,FL_TRANSIENT,"Question");
      fl_do_forms();
  }
In this example, callback routines for both the yes and no
buttons are first defined. Then they are registered with the system
using fl_set_object_callback(). After the form is shown,
the event handling is again handed to the main loop in
Forms Library via fl_do_forms(). In this case, whenever the buttons are
pushed, the callback routine is invoked with the object being
pushed as the first argument to the callback function,
and fl_do_forms() never returns.
You might also notice that in this example, both buttons are made anonymous, that is, it is not possible to reference the buttons directly outside of the creation routine. This is often desirable when callback functions are bound to objects as the objects themselves will not be referenced except as callback arguments. By creating anonymous objects, a program avoids littering itself with useless identifiers.
The callback model presented above is the preferred way of interaction for typical programs and it is strongly recommended that all programs using xforms be coded using object callbacks.
fl_do_forms(), retrieves events from the X event queue,
dispatches the retrieved event through appropriate objects,
and notifies the application of what action, if any, should be taken.
The actual notification methods depend on how the interaction
is set up, which could be object callback or by returning
to the application program the object whose status has changed.
In this chapter we will describe the basics of defining forms. Not all possible classes of objects are described here, only the most important ones. Also, for most classes only a subset of the available types are described. See Part iii for a complete overview of all object classes currently available.
Normally you will almost never write the code to define forms yourself because the package includes a Form Designer that does this for you (see Part ii). Still it is useful to read through this chapter because it explains what the different object classes are and how to work with them.
A form consists of a collection of objects. A form definition is started with the routine
FL_FORM *fl_bgn_form(int type, FL_Coord w, FL_Coord h)
w and h indicate the width and height of the form (in pixels by default), i.e., the largest x- and y-coordinate that can be used in the form. Positions in the form will be indicated by integers between 0 and w-1 or h-1. The actual size of the form when displayed on the screen can still be varied. type indicates the type of the background drawn in the form. The background is a box. See the next section for the different types available and their meanings. The routine returns a pointer to the form just defined. This pointer must be used, for example, when drawing the form or doing interaction with it. The form definition ends with
void fl_end_form(void)
Between these two calls objects are added to the form. The following sections describe all the different classes of objects that can be added to a form.
Many different forms can be defined and displayed when required. It is a good habit to first define all your forms before starting the actual work.
The first type of objects are boxes. Boxes are simply used to give the dialogue forms a nicer appearance. They can be used to visually group other object together. The bottom of each form is a box. To add a box to a form you use the routine
   FL_OBJECT *fl_add_box(int type,FL_Coord x,FL_Coord y,
                         FL_Coord w,FL_Coord h, const char *label)
type indicates the shape of the box. The Forms Library at the moment supports the following types of boxes:
FL_NO_BOXNo box at all, only a centered label.
FL_UP_BOXA box that comes out of the screen.
FL_DOWN_BOXA box that goes down into the screen.
FL_BORDER_BOXA flat box with a border.
FL_SHADOW_BOXA flat box with a shadow.
FL_FRAME_BOXA flat box with an engraved frame.
FL_ROUNDED_BOXA rounded box.
FL_EMBOSSED_BOXA flat box with an embossed frame.
FL_FLAT_BOXA flat box without a border.
FL_RFLAT_BOXA rounded box without a border.
FL_RSHADOW_BOXA rounded box with a shadow.
FL_OVAL_BOXA box shaped like an ellipse .
FL_ROUNDED3D_UPBOXA rounded box coming out of the screen.
FL_ROUNDED3D_DOWNBOXA rounded box going into the screen.
FL_OVAL3D_UPBOXAn oval box coming out of the screen.
FL_OVAL3D_DOWNBOXAn oval box going into the screen.
x and y indicate the upper left corner of the box in the form.
w and h are the width and height of the box.
label is a text that is placed in the center of the box. If you
don't want a label in the box, use an empty string. The label can be either
one line or multiple lines. To obtain multi-line
labels ,
insert newline characters (\n) in the label string.
It is also possible to
underline
the label or
one of the characters in the label. This is accomplished by
by embedding <CNTRL> H (\010) after the letter
that needs to be underlined. If the first character of the label
is <CNTRL> H, the entire label is underlined:
u\010nderl\010ined | | underlinded |
\010underlined | | underlined |
The routine fl_add_box() returns a pointer to the box object. (All
routines that add objects return a pointer to the object.) This pointer
can be used for later references to the object.
It is possible to change the appearance of a box in a form. First of all, it is possible to change the color of the box and secondly, it is possible to change color, size and position of the label inside the box. Details on changing attributes of objects can be found in section 3.11. Just a simple example has to suffice here. Assume we want to create a red box, coming out of the screen with the large words ``I am a Box'' in green in the center:
   FL_OBJECT *thebox;

   thebox = fl_add_box(FL_UP_BOX,20,20,100,100,"I am a Box");
   fl_set_object_color(thebox,FL_RED,0);       /* make box red */
   fl_set_object_lcol(thebox,FL_GREEN);        /* make label green */
   fl_set_object_lsize(thebox,FL_LARGE_SIZE);  /* make label large */
Of course, this has to be placed inside a form definition.
A second type of object is text. Text can be placed at any place on the form in any color you like. Placing a text object is done with the routine
   FL_OBJECT *fl_add_text(int type,FL_Coord x,FL_Coord y,
                          FL_Coord w,FL_Coord h,const char *label)
type indicates the shape of the text. The Forms Library at the moment
supports only one type of text: FL_NORMAL_TEXT.
The text can be placed inside a box using the routine
fl_set_object_boxtype() to be described in
section 3.11. Again, the text can be multi-lined
or underlined by embedding respectively the newline (\n)
or <CNTRL> H (\010) in the label.
The style, size and color of the text can be
controlled and changed in many ways. See section 3.11.
Note that there is almost no difference between a box with a label and a text. The only difference lies in the position where the text is placed. Text is normally placed inside the box at the left side. This helps you put different lines of text below each other. Labels inside boxes are by default centered in the box. You can change the position of the text inside the box using the routines in section 3.11. Note that, when not using any box around the text there is no need to specify a width and height of the box; they can both be 0.
A very important class of objects are buttons. Buttons are placed on the form such that the user can push them with the mouse. Different types of buttons exist: buttons that return to their normal position when the user releases the mouse, buttons that stay pushed until the user pushes them again and radio buttons that make other buttons be released. Adding a button to a form can be done using the following routine
   FL_OBJECT *fl_add_button(int type,FL_Coord x,FL_Coord y,
                            FL_Coord w,FL_Coord h, const char *label)
label is the text placed inside (or next to) the button. type indicates the type of the button. The Forms Library at the moment supports a number of types of buttons. The most important ones are:
		FL_NORMAL_BUTTON

		FL_PUSH_BUTTON

		FL_TOUCH_BUTTON

		FL_RADIO_BUTTON
They all look the same on the screen but their functions are quite different. Each of these buttons gets pushed down when the user presses the mouse on top of them. What actually happens when the user does so depends on the type of button. A normal button returns to its normal position when the user releases the mouse button. A push button remains pushed and is only released when the user pushes it again. A touch button is like a normal button except that as long as the user keeps the mouse pressed it is returned to the application program (see chapter 4 on the interaction).
A radio button is a push button with the following extra property. Whenever the user pushes a radio button, all other pushed radio buttons in the form (or in a group, see below) are released. In this way the user can make a choice among some mutually exclusive possibilities.
Whenever the user pushes a button and then releases the mouse, the
interaction routine fl_do_forms() is interrupted and returns a
pointer to the button that was pushed and released. If a callback routine
is present for the object being pushed, this routine will be invoked.
In either case, the application program knows that the button was
pushed and can take action accordingly. In the first case,
control will have to be returned to
fl_do_forms() again after the appropriate action is performed;
and in the latter, fl_do_forms() would never return.
See chapter 4
for details on the interaction with forms.
Different types of buttons are used in all the example programs provided. The application program can also set a button to be pushed or not itself without a user action. (This is of course only useful for push buttons and radio buttons. Setting a radio button does not mean that the currently set radio button is reset. The application program has to do this.) To set or reset a button use the routine
void fl_set_button(FL_OBJECT *obj,int pushed)
pushed indicates whether the button should be pushed (1) or released (0). To figure out whether a button is pushed or not use
int fl_get_button(FL_OBJECT *obj)
See the program pushbutton.c for an example of the use of push buttons and setting and getting button information.
The color and label of buttons can again be changed using the routines in section 3.11.
There are other classes of buttons available that behave the same way as buttons but only look different.
fl_add_lightbutton() with the same parameters as normal buttons.
The other routines are exactly the same as for normal buttons.
The color of the light can be
controlled with the routine fl_set_object_color(). See section
3.11.
fl_add_roundbutton() to add a round button to a form.
Round and light buttons are nice as radio buttons.
fl_add_checkbutton(). More stylish for a group of radio
buttons.
fl_add_bitmapbutton() to add a bitmap button
to a form.
fl_add_pixmapbutton() to add a pixmap
button to a form.
Playing with different boxtypes, colors, etc., you can make many different types of buttons. See buttonall.c for some examples. Fig. 16.1 shows all buttons in their default states.
Sliders are useful in letting the user indicate a value between some fixed bounds. A slider is added to a form using the routine
   FL_OBJECT *fl_add_slider(int type,FL_Coord x,FL_Coord y,
                            FL_Coord w,FL_Coord h, const char *label)
The two most important types of sliders are
FL_VERT_SLIDER and FL_HOR_SLIDER.
The former displays a slider that can be moved vertically and the latter
gives a slider that moves horizontally. In both cases the label is placed below the slider.
Default value of the slider is 0.5 and can vary between 0.0 and 1.0.
These values can be changed using the routines:
   void fl_set_slider_value(FL_OBJECT *obj,double val)

   void fl_set_slider_bounds(FL_OBJECT *obj,double min,double max)
Whenever the value of the slider is changed by the user, it results in the slider being returned to the application program or the callback routine invoked. The program can read the slider value using the call
double fl_get_slider_value(FL_OBJECT *obj)
and take action accordingly. See the example program demo05.c for the use of these routines.
Valslider is almost identical with a normal slider. The only
difference is the way the slider is drawn. For valsliders,
in addition to the slider itself, its current value is also shown.

Figure 3.2: Slider and Valslider
To add a val slider, use
   FL_OBJECT *fl_add_valslider(int type,FL_Coord x,FL_Coord y,
                            FL_Coord w,FL_Coord h, const char *label)
It is often required to obtain textual input from the user, e.g. a file name, some fields in a database, etc. To this end input fields exist in the Forms Library. An input field is a field that can be edited by the user using the keyboard. To add an input field to a form use
   FL_OBJECT *fl_add_input(int type,FL_Coord x,FL_Coord y,
                           FL_Coord w,FL_Coord h,const char *label)
The main type of input field available is
FL_NORMAL_INPUT. The input field normally looks like an
FL_DOWN_BOX. This can be changed using the routine
fl_set_object_boxtype() to be described in
section 3.11.
Whenever the user presses the mouse inside an input field a cursor will appear in it (and it will change color). Further input will appear inside this field. Full emacs(1) style editing is supported. When the user presses <RETURN> or <TAB> the input field is returned to the application program and further input is directed to the next input field. (The <RETURN> key only works if there are no default buttons in the form. See the overview of object classes. The <TAB> key always works.)
The user can use the mouse to select parts of the input field which will be removed when the user types the erase character or replaced by any new input the user types in. Also the location of the cursor can be moved in the input field using the mouse.
The input field is fully integrated with the X Selection mechanism. Use the left button to cut from and the middle button to paste into an input field.
The application program can direct the focus to a particular object using the call
void fl_set_focus_object(FL_FORM *form,FL_OBJECT *obj)
It puts the input focus in the form form onto object obj.
To obtain the focus object, the following routine is available
FL_OBJECT *fl_get_focus_object(FL_FORM *form)
Note that the label is not the default text in the input field. The label is (by default) placed in front of the input field. To set the contents of the input field use the routine
void fl_set_input(FL_OBJECT *obj,const char *str)
To change the color of the input text or the cursor use
void fl_set_input_color(FL_OBJECT *obj,int tcol,int ccol)
Here tcol indicates the color of the text and ccol is the color of the cursor. To obtain the string in the field (when the user has changed it) use:
[const] char *fl_get_input(FL_OBJECT *obj)
Notice the bracket around the qualifier const. This indicates
although the function is not declared to return a pointer to const
string, it should be used as one. This is done mainly for compilation
on machines whose string library header is buggy.
Modifying the string returned by this function can produce
unpredictable results.
See the program demo06.c for an example of the use of input fields.
Objects inside a form definition can be grouped together. To this end we place them in between the routines
FL_OBJECT *fl_bgn_group(void)
and
FL_OBJECT * fl_end_group(void)
Groups should never be nested. Groups are useful for two reasons. First of all it is possible to hide groups of objects (see section 3.9 below). This is often very handy. We can, for example, display part of a form only when the user asks for it (see demo program group.c). Some attributes are naturally multi-objects, e.g., to glue several objects together using the gravity attribute. Instead of setting the gravity for each object, you can place all related objects inside a group and set the resize/gravity attribute of the group.
The second reason is for using radio buttons. As indicated in section 3.4 pushing a radio button makes the currently pushed radio button released. In fact, this happens only with radio buttons in the particular group. So to make two pairs (or more) of radio buttons, simply put each pair in a different group so that they won't interfere with each other. See, e.g., the example program buttonall.c. It is a good idea to always put radio buttons in a group, even if you have only one set of them.
It is possible to add objects to an existing group
void fl_addto_group(FL_OBJECT *group)
where group is the object returned by fl_bgn_group().
After this call, you can start adding objects to the group
(e.g., fl_add_button etc). The newly added objects
are appended at the end of the group. When through adding,
use fl_end_group as before.
It is possible to temporarily hide certain objects or groups of objects. To this end, use the routine
void fl_hide_object(FL_OBJECT *obj)
obj is the object to hide or the group of objects to hide. Hidden objects don't play any role anymore. All routines on the form act as if the object does not exist. To make the object or group of objects visible again use
void fl_show_object(FL_OBJECT *obj)
Hiding and showing (groups of) objects are useful to change the appearance of a form depending on particular information provided by the user. You can also make overlapping groups in the form and take care that only one of them is visible.
Sometimes you might want a particular object to be temporarily inactive, e.g., you want to make it impossible for the user to press a particular button or to type input in a particular field. For this you can use the routine
void fl_deactivate_object(FL_OBJECT *obj)
obj is the object to be deactivated. When obj is a group the whole group is deactivated. To reactivate the group or button use the routine
void fl_activate_object(FL_OBJECT *obj)
Normally you also want to give the user a visual indication that the object is not active. This can, for example, be done by changing the label color to grey (see below.)
It is possible to simulate the action of an object being triggered from within the program by using the following routine
void fl_trigger_object(FL_OBJECT *)
Calling this routine on an object results in the object returned to the
application program or its callback called if it exists. Note however,
there is no visual feedback, i.e., fl_trigger_object(button)
will not make the button appear pushed.
There are a number of general routines that can be used to alter the appearance of any object.
To change the color of a particular object use the routine
void fl_set_object_color(FL_OBJECT *obj,FL_COLOR col1,FL_COLOR col2)
col1 and col2 are indices into a colormap.
Which colors are actually changed depend on the type
of objects.
For box and text only col1 is important. It indicates
the color of the box or of the box in which the text is placed.
For buttons, col1 is the color of the button when released and
col2 is the color of the button when pushed. (Note that when changing
the color of a button the nice property that the color of a button changes
when the mouse moves over it disappears.) For light buttons the two colors
indicate the color of the light when off and when on.
For bitmap buttons, col1 is the color of the box and
col2 is the color of the bitmap. For sliders col1
is the color of the background of the slider and col2 is the
color of the slider itself. Finally, for input objects col1
is the color of the input field when it is not selected and col2
is the color when it is selected. For all types of objects, the default
colors can be found in the file forms.h. For example, for input
fields the default colors are FL_INPUT_COL1 and
FL_INPUT_COL2. Form Designer comes in very handy in familiarizing you
with various attributes since you can change all attributes of an
object and immediately see the difference by ``test''ing the object.
The following pre-defined color symbols can be used in all color change requests. If the workstation does not support this many colors, substitutions with the closest color will be made.
Name RGB triple FL_BLACK ( 0, 0, 0) FL_RED (255, 0, 0) FL_GREEN ( 0,255, 0) FL_YELLOW (255,255, 0) FL_BLUE ( 0, 0,255) FL_CYAN ( 0,255,255) FL_MAGENTA (255, 0,255) FL_WHITE (255,255,255) FL_COL1 (161,161,161) FL_MCOL (191,191,191) FL_TOP_BCOL (204,204,204) FL_BOTTOM_BCOL ( 89, 89, 89) FL_RIGHT_BCOL ( 51, 51, 51) FL_LEFT_BCOL (222,222,222) FL_INACTIVE_COL (110,110,110) FL_TOMATO (255, 99, 71) FL_INDIANRED (198,113,113) FL_SLATEBLUE (113,113,198) FL_DARKGOLD (205,149, 10) FL_PALEGREEN (113,198,113) FL_ORCHID (205,105,201) FL_DARKCYAN ( 40,170,175) FL_DARKTOMATO (139, 54, 38) FL_WHEAT (255,231,155) FL_FREE_COL1 ( ?, ?, ?)
In the above table, FL_FREE_COL1 has the the largest
numerical value, and all color indices smaller than that
are used (or can potentially be used) by the Forms Library although if you wish,
they can also be changed using the following routine prior to
fl_initialize:
void fl_set_icm_color(FL_COLOR index, int r, int g, int b)
Note that although the color of an object is indicated by a single index,
it is not necessarily true that the Forms Library is operating in
PseudoColor. Forms Library is capable of operating
in all visuals and as a matter of fact the Forms Library will always
select TrueColor or DirectColor if the hardware is capable of
it. The actual color is handled by an internal
colormap of FL_MAX_COLS
entries (default 1024).
To change or query the values of this internal colormap use the call
   void fl_set_icm_color(FL_COLOR index, int r, int g, int b)
   void fl_get_icm_color(FL_COLOR index, int *r, int *g, int *b)
Call fl_set_icm_color before fl_initialize
to change XForms's default colormap. Note these two routines
do not communicate with the X server, they only populate/return
information about the internal colormap, which is
made known to the X server by the initialization routine fl_initialize.
To change the colormap and make a color index active so that it can be used in various drawing routines, use the following function
unsigned long fl_mapcolor(FL_COLOR i, int red, int green, int blue);
This function frees the previous allocated pixel corresponding
to color index i and re-allocates a pixel with the RGB value specified.
The pixel value is returned by the function.
It is recommended that you use index larger than FL_FREE_COL1 for
your remap request to avoid accidentally free the colors
you have not explicitly allocated. Index i larger than
2 ![]() is reserved and should not be used.
is reserved and should not be used.
Sometimes it may be more convenient to associate an index with a colorname, e.g., "red" etc., which may have been obtained via resources. To this end, the following routine exists
long fl_mapcolorname(FL_COLOR i, const char *name)
where name is the color name![]() . The function returns -1 if the colorname
name is not resolved.
. The function returns -1 if the colorname
name is not resolved.
You can obtain the RGB values of an index by using the following routine
unsigned long fl_getmcolor(FL_COLOR i, int *red, int *green, int *blue);
Function returns the pixel value as known by the Xserver. If the
requested index, i, is never mapped or is freed,
the rgb values as well as the pixel value are random. Since
this function communicates with the xserver to obtain the
pixel information, it has a two-way traffic overhead. If you're
only interested in the internal colormap of xforms,
fl_get_icm_color() is more efficient.
Note that the current version only uses the lower byte of the primary color. Thus all primary colors in the above functions should be specified in the range of 0-255 inclusive .
To free any colors that you no longer need, the following routine should be used
void fl_free_colors(FL_COLOR colors[], int ncolors)
Prior to version 0.76, there is a color ``leakage" in the implementation
of the internal colormap that prevents the old index from being freed
in the call fl_mapcolor(index, r, g, b), resulting in
.
.
accelerated colormap overflow and some other undesired behavior.
Since there are many applications based on older versions of the Forms Library,
a routine is provided to force the library to be compatible
with the (buggy) behavior:
void fl_set_color_leak(int flag);
Due to the use of an internal colormap and the simplified user interface, changing the colormap value for the index index may not result in a change of the color for the object. An actual redraw of the object (see below) whose color is changed may be required to have the change take effect. Therefore, a typical sequence of changing the color of a visible object is as follows:
   fl_mapcolor(newcol, red, green, blue)  /* obj uses newcol */
   fl_redraw_object(obj);
Each object has a bounding box. This bounding
box can have different shapes. For boxes it is determined by the type.
For text it is normally not visible. For input fields it normally is
a FL_DOWN_BOX, etc. The shape of the box can be changed using the
routine
void fl_set_object_boxtype(FL_OBJECT *obj,int boxtype)
boxtype should be one of the following: FL_UP_BOX,
FL_DOWN_BOX, FL_FLAT_BOX, FL_BORDER_BOX,
FL_SHADOW_BOX, FL_ROUNDED_BOX, FL_RFLAT_BOX,
FL_RSHADOW_BOX and FL_NO_BOX,
with the same meaning as the type for boxes. Some care has to be taken
when changing boxtypes. In particular, for objects like sliders,
input fields, etc. never use the boxtype FL_NO_BOX. Don't change the
boxtype of objects that are visible on the screen. It might have undesirable
effects. If you must do so, redraw the entire form after changing
the boxtype of an object (see below).
See the program boxtype.c for the effect of the boxtype on the different
classes of objects.
It is possible to alter the appearance of an object by changing the border width attribute
fl_set_object_bw(FL_OBJECT *obj, int bw)
Border width controls the ``height'' of an object, e.g.,
a button having a border width of 3 pixels appears more pronounced
than one having a border width of 2 (see Fig 3.4). The Forms Library's
default is FL_BOUND_WIDTH(3) pixels. Note that the border
width can be negative. Negative border width does not make a down box,
rather, it makes the object having an upbox appear less pronounced and
``softer''. See program borderwidth.c for the effect of border
width on different objects. Typically on high resolution monitors ( ![]() 1k x 1k), the default looks nice, but on lower resolution
monitors, a border width of -2 probably looks better.
1k x 1k), the default looks nice, but on lower resolution
monitors, a border width of -2 probably looks better.
All applications developed using xforms accept a command line option
-bwn the user can use to select the preferred border width.
It is recommended that you document this flag in your application
documentation. If you prefer a certain border width, use
fl_set_defaults() before
fl_initialize() to set the border width instead of hard-coding
it on a per form or per object basis so the user has the option to change it
at run time via the -bw flag.
There also exists a call that changes the object border width for the entire application
void fl_set_border_width(int border_width)

Figure 3.4: Object Border Width
There are also a number of routines to change the appearance of the label. The first one is
void fl_set_object_lcol(FL_OBJECT *obj,FL_COLOR lcol)
It sets the color of the label. The default is black (FL_BLACK).
The font size of the label can be changed using the
routine
void fl_set_object_lsize(FL_OBJECT *obj,int lsize)
lsize gives the size in points. Depending on the server and fonts installed, arbitrary sizes may or may not be possible. Fig 3.5 shows the font sizes that are standard with MIT/XConsortium distribution. So use of these values is encouraged. In any case, if a requested size can not be honored, substitution will be made. The default size for XForms is 10pt.

Figure 3.5: Standard Font Sizes
Labels can be drawn in many different font styles. The style of the label can be controlled with the routine
void fl_set_object_lstyle(FL_OBJECT *obj,int lstyle)
The default font for the Forms Library is Helvetica at 10pt. Additional styles are available:
FL_NORMAL_STYLENormal text
FL_BOLD_STYLEBoldface text
FL_ITALIC_STYLEGuess what
FL_BOLDITALIC_STYLEBoldItalic
FL_FIXED_STYLEFixed width (good for tables)
FL_FIXEDBOLD_STYLE
FL_FIXEDITALIC_STYLE
FL_FIXEDBOLDITALIC_STYLE
FL_TIMES_STYLETimes-Roman like font
FL_TIMESBOLD_STYLE
FL_TIMESITALIC_STYLE
FL_TIMESBOLDITALIC_STYLE
FL_SHADOW_STYLEText casting a shadow
FL_ENGRAVED_STYLEText engraved into the form
FL_EMBOSSED_STYLEText standing out
The last three styles are special in that they are modifiers, i.e.,
they do not cause font changes themselves, they only modify the
appearance of the font already active. E.g.,
to get a bold engraved text, set lstyle to
FL_BOLD_STYLE|FL_ENGRAVED_STYLE.
Other styles correspond to the first 12 fonts. The package, however, can handle up to 48 different fonts. The first 16 (numbers 0-15) have been pre-defined. The following table gives their names:
0 helvetica-medium-r1 helvetica-bold-r
2 helvetica-medium-o
3 helvetica-bold-o
4 courier-medium-r
5 courier-bold-r
6 courier-medium-o
7 courier-bold-o
8 times-medium-r
9 times-bold-r
10 times-medium-o
11 times-bold-o
12 charter-medium-r
13 charter-bold-r
14 charter-medium-i
15 Symbol
The other 32 fonts (numbers 16-47) can be filled in by the application program. Actually, the application program can also change the first 16 fonts if required (e.g., to force a particular resolution ). To change a font for the the entire application, use the following routine:
int fl_set_font_name(int style, const char *name)
where style is the number of the font (between 0 and 47) and name
should be a valid font name (with the exception of the size field).
The function returns a negative value if the requested font
is invalid or otherwise can't be loaded. Note however, if this
routine is called before fl_initialize(), it will
return 0, but may fail later if the font name is not valid.
To change the default font
(helvetica-medium), a program should
change font FL_NORMAL_STYLE
If a font name in XLFD is given, a question mark (?) in the point size position informs the Forms Library that variable size will be requested later. It is preferable that the complete XLFD name (i.e., with 14 dashes and possibly wildcards) be given because a complete name has the advantage that the font may be re-scalable if scalable fonts are available. This means that although both
   "-*-helvetica-medium-r-*-*-*-?-*-*-*-*-*-*"
   "-*-helvetica-medium-r-*-*-*-?-*-*"
are valid font names, the first form may be re-scalable while the the second is not.
To obtain the actual built-in font names, use the following function
int fl_enumerate_fonts(void (*cb)(const char *f), int shortform)
where cb is a callback function that gets called once for every built-in font name. The font name is passed to the callback function as the string pointer parameter. sform selects if a short form of the name should be used.
XForms only specifies the absolutely needed parts of the font names,
and assumes the font path is set so that the server always chooses
the most optimal fonts for the system. If this is not true, you can
use fl_set_font_name to select the exact font you want. In general,
this is not recommended if your application is to be run/displayed on
different servers.
See fonts.c for a demonstration of all the built-in font styles available.
You can change the alignment of the label with respect to the bounding box of the object. For this you use the routine
void fl_set_object_lalign(FL_OBJECT *obj,int align)
The following possibilities exist:
FL_ALIGN_LEFTTo the left of the box.
FL_ALIGN_RIGHTTo the right of the box.
FL_ALIGN_TOPTo the top of the box.
FL_ALIGN_BOTTOMTo the bottom of the box.
FL_ALIGN_CENTERIn the middle of the box.
FL_ALIGN_RIGHT_BOTTOMTo the right and bottom of the box.
FL_ALIGN_LEFT_BOTTOMTo the left and bottom of the box.
FL_ALIGN_RIGHT_TOPTo the right and top of the box.
FL_ALIGN_LEFT_TOPTo the left and top of the box.
Normally, all the alignment request places the text outside the box,
except for FL_ALIGN_CENTER. This can be changed by using a
special mask, FL_ALIGN_INSIDE, to request alignments that place
the text inside the box. This works for most of the objects in the library
but not for all. For sliders, inputs and some others, placing the label
inside the box simply does not make sense. In these cases, inside request
is ignored. See the demo program lalign.c for an example use
of FL_ALIGN_INSIDE.
Finally, the routine
void fl_set_object_label(FL_OBJECT *obj, const char *label)
changes the label of a given object. The passed parameter label
is copied internally. As mentioned earlier,
newline (\n) can be embedded in the label to generate
multiple lines. By embedding <CNTRL> Control (\010) in the
label, the entire label or one of the characters in the label
can be underlined.
A word of caution is required. It is possible to change the attributes
of an object at any time. But when the form is already displayed
on the screen some care has to be taken. Whenever changing attributes the
system redraws the object. This is fine when drawing the object erases the
old one but this is not always the case. For example, when placing labels
outside the box (not using FL_ALIGN_CENTER) they are not correctly
erased. It is always possible to force the system to redraw an object
using
void fl_redraw_object(FL_OBJECT *obj)
When the object is a group it redraws the complete group. To redraw an entire form, use
void fl_redraw_form(FL_FORM *form)
Use of these routines is normally not necessary and should be kept to an absolute minimum.
Whenever you change an attribute of an object in a visible form the object is redrawn immediately to make the change visible. This can be undesirable when you change a number of attributes of the same object. You only want the changed object to be drawn after the last change. Drawing it after each change will give a flickering effect on the screen. This gets even worse when you e.g. want to hide a few objects. After each object you hide the entire form is redrawn. In addition to the flickering, it is also time consuming. Thus it is more efficient to tell the library to temporarily not redraw the form while changes are being made. This can be done by ``freezing'' the form. While a form is being frozen it is not redrawn, all changes made are instead buffered internally. Only when you unfreeze the form, all changes made in the meantime are drawn at once. For freezing and unfreezing two calls exist:
void fl_freeze_form(FL_FORM *form)
void fl_unfreeze_form(FL_FORM *form)
It is a good practice to place multiple changes to the contents of a form always between calls to these two procedures. Further, it is better to complete modifying the attributes of one object before starting work on the next.
Rather than textual labels, it is possible to place symbols like arrows etc. on objects. This is done in the following way:
When the label starts with the character @ no label is drawn but a
particular symbol is drawn instead. The rest of the label string indicates the
symbol. A number of pre-defined symbols are available:
->Normal arrow pointing to the right.
<-Normal arrow pointing to the left.
>Triangular arrow pointing to the right.
<Triangular arrow pointing to the left.
>>Double triangle pointing to the right.
<<Double triangle pointing to the left.
<->Arrow pointing left and right.
->|A normal arrow with a bar at the end
>|A triangular arrow with a bar at the end
-->A thin arrow pointing to the right.
=Three embossed lines.
arrowSame as-->.
returnarrow<RETURN> key symbol.
squareA square.
circleA circle.
lineA horizontal line.
plusA plus sign (can be rotated to get a cross).
UpLineAn embossed line.
DnLineAn engraved line.
UpArrowAn embossed arrow.
DnArrowAn engraved arrow.
See Fig. 3.6 for how some of them look. See also symbols.c.

Figure 3.6: Some built-in and rotated symbols
It is possible to put the symbols in different orientations. When the symbol
name is preceded by a digit 1-9 (not 5) it is rotated like on the numerical
keypad, i.e., 6 indicates no rotation, 9 a rotation of 45 degrees
counter-clockwise, 8 a rotation of 90 degrees, etc. Hence the order
is 6, 9, 8, 7, 4,
1, 2, 3. (Just think of the keypad as consisting of arrow keys.) So to get an
arrow that is pointing to the left top use a label @7->.
To put the symbol in other orientations, put a 0 after the @,
followed by three digits that indicate the angle (counter-clockwise). E.g. to
draw an arrow at an angle of 30 degrees use label @0030->.
The symbol will be scaled to fit in the bounding box with. When the
bounding box is not square, scaling in the x- and y-directions will
be different. If keeping the aspect ratio is desired, put a sharp
(#) immediately after the @. E.g., @#9->.
Two additional prefixes, + and -, followed
by a single digit, can be used to make small symbol
size adjustment. These prefixes must be either immediately
after @ or follow #. The + indicates
increase the symbol size and - indicates
decrease the symbol size. The digit following the prefixes
indicates the increment (decrement) in pixels. For example,
to draw a circle that is 3 pixels smaller in radius than the
default size, use @-3square.
In addition to using symbol as object labels, symbols can also be drawn directly using
    void fl_draw_symbol(const char *symbolname, FL_Coord x, FL_Coord y,
                        FL_Coord w, FL_Coord h, FL_Color col)
or indirectly via fl_drw_text().
The application program can also add symbols to the system which it can then use to display symbols on objects that are not provided by the Forms Library. To add a symbol, use the call
int fl_add_symbol(const char *name, void (*drawit)(),int sc)
name is the name under which the symbol should be known (at most 15
characters), without the leading @.
drawit is the drawing routine that draws the symbol.
sc is reserved and currently has no meaning. Simply setting it to
zero would do.
The routine drawit should have the form
   void drawit(FL_Coord x, FL_Coord y, FL_Coord w, FL_Coord h,
               int angle, FL_COLOR col)
col is the color in which to draw the symbol.
This is the label color that can be provided and changed by the
application program. The routine should draw the symbol centered
inside the box given by x,y,w,h and rotated from
its natural position by angle degrees. The draw
function can call all types of drawing routines, including
fl_draw_symbol()
If the new symbol name is the same as one of the built-ins, the new definition overrides the build-in. Note the the new symbol does not have to be vector graphics, you can use pixmap or whatever in the drawing function.
The symbol handling routines really should be viewed as a means of associating an arbitrary piece of text (the label) with arbitrary graphics, application of which can be quite pleasant given the right tasks.
In some situations you might want to add an object to an existing form. This can be done using the call
void fl_addto_form(FL_FORM *form)
After this call you can start adding objects to the form using
fl_add_button etc. To stop adding
objects to the form use fl_end_form() as before.
It is possible to add objects to forms that are being displayed, but
this is not always a good idea because not everything behaves well
(e.g. strange things might happen when a group is started but not
yet finished).
To delete an object from a form simply use
void fl_delete_object(FL_OBJECT *obj)
It deletes the object from the form it is currently in. The object remains available and can be added to the same or another form later using
void fl_add_object(FL_FORM *form,FL_OBJECT *obj)
Use of these calls is discouraged because some have side effects. (E.g. adding the same object to multiple forms will most likely result in a memory fault.) Also watch out with deleting group objects. Not the whole group is deleted, only the object that marks its start is, which gives strange effects.
If the application program does not need an object anymore, it can free the memory used by the object using the call
void fl_free_object(FL_OBJECT *obj)
After this the object can no longer be used. Take care that you delete the object from the form it is in before freeing it.
To free the memory used by an entire form use the call
void fl_free_form(FL_FORM *form)
This will free the form itself and all the objects in it. A freed form should not be referenced.
After having defined the forms the application program can use them to interact with the user. As a first step the program has to display the forms with which it wants the user to interact. This is done using the routine
Window fl_show_form(FL_FORM *form,int place,int border, const char *name)
It opens a (top-level) window on the screen in which
the form is shown. The name is the title of the
form (and its associated icon if any).
The routine returns the window resource ID of the form.
You normally never need this. Immediately after the
form becomes visible, a full draw of all objects on the form
is performed. Due to the two way buffering mechanism of Xlib,
if fl_show_form() is followed by something
that blocks (e.g., waiting for a device other than X devices
to come online), the output buffer might not be properly flushed,
resulting in the form only being partially drawn. If your program
works this way, use XFlush(fl_get_display()) after
fl_show_form(). For typical programs that use
fl_do/check_forms() after fl_show_form(),
flushing is not necessary.
The location and size of the window are determined by place. The following possibilities exist:
fl_set_form_position(). Interactive resizing
is possible.
fl_set_form_geometry().
A form so shown will
have a fixed size and interactive resizing is not allowed.
FL_FREE_SIZE
as in FL_PLACE_MOUSE|FL_FREE_SIZE.
FL_FREE_SIZE is also specified, interactive resizing
will be allowed.
FL_FREE_SIZE is also specified, inter ative resizing
will be allowed.
fl_set_form_position(), will be used otherwise
interactive positioning may be possible if the window manager
allows it.
FL_FREE_SIZE is also specified, interactive resizing
will be allowed.
FL_PLACE_CENTER|FL_FREE_SIZE, i.e., place
the form at the center of the screen and allow resizing.
Sometimes it might desirable to obtain the window ID before the form is shown so the application has an opportunity to further customize the window attributes before presenting the form to the user. To this end, the following routine exists:
   Window fl_prepare_form_window(FL_FORM *form, int place,
                                 int border, const char *name)
The function returns the window ID of the form. After this is done, you must use the following
void fl_show_form_window(FL_FORM *form)
to make the form visible.
If size is not specified, the designed (or later scaled) size will be used.
Note that the initial position is dependent upon the window manager used. Some window managers will allow interactive placement of the windows and some will not.
You can set the position or size to be used via the following calls
void fl_set_form_position(FL_FORM *form,FL_Coord x,FL_Coord y)
void fl_set_form_size(FL_FORM *form,FL_Coord w,FL_Coord h)
or more conveniently
   void fl_set_form_geometry(FL_FORM form*, FL_Coord x, FL_Coord y,
                             FL_Coord w, FL_Coord h)
before placing the form on the screen. (Actually the routines can also
be called while the form is being displayed. It will change shape.)
x, y, w and h indicate the position of the
form on the screen and its size.![]() The
position is measured from the top-left corner of the screen.
When the position is negative the distance from the right or the bottom
is indicated. Next the form should be placed on the screen
using
The
position is measured from the top-left corner of the screen.
When the position is negative the distance from the right or the bottom
is indicated. Next the form should be placed on the screen
using FL_PLACE_GEOMETRY, FL_PLACE_FREE. E.g., to place
a form at the lower-right corner of the screen use
   fl_set_form_position(form,-form->w,-form->h);
   fl_show_form(form,FL_PLACE_GEOMETRY,FL_TRANSIENT,"formName");
To show a form so that a particular object or point is on the mouse, use one of the following two routines to set the ``hotspot"
   void fl_set_form_hotspot(FL_FORM *form, FL_Coord x, FL_Coord y);

   void fl_set_form_hotobject(FL_FORM *form, FL_OBJECT *ob);
and use FL_PLACE_HOTSPOT in fl_show_form
to realize. The coordinates x and y are relative
to the upper-left corner of the form.
In the call fl_show_form() the argument border indicates
whether or not to request window manager's decoration. border
should take one of the following values:
FL_FULLBORDERfull border.
FL_TRANSIENTborder with (possibly) less decoration.
FL_NOBORDERno decoration at all.
For some dialogs, such as demanding an answer etc., you probably do not
want window manager's full decoration. Use FL_TRANSIENT
for this.
A window border is useful to let the user iconify a form or move
it around. If a form is transient or has no border, it is
normally more difficult (or even impossible) to move the form.
A transient form typically should have less
decoration, but not necessarily so. It depends on window mangers as
well as their options. FL_NOBORDER is
guaranteed to have no border![]() and is immune to iconification request.
Because of this, borderless forms can be hostile to other
applications
and is immune to iconification request.
Because of this, borderless forms can be hostile to other
applications![]() , so use this only
if absolutely necessary.
, so use this only
if absolutely necessary.
There are other subtle differences between the different
decoration requests. For instance, (small) transient forms always have
save_under (See XSetWindowAttributes(3X11)) set to true
by default. Some window properties,
WM_COMMAND
in particular, are only set for full-bordered forms and will only
migrate to other full-bordered forms when the original form having
the property becomes unmapped.
The library has a notion of a ``main form" of an application, roughly the form that would be on the screen the longest. By default, the first full-bordered form shown becomes the main form of the application. All transient windows shown afterwards will stay on top of the main form. The application can set or change the main form anytime using the following routine
void fl_set_app_mainform(FL_FORM *form)
Setting the main form of an application will cause the
WM_COMMAND property set for the form if no other form
has this property.
Sometimes, it is necessary to have access to the window resource ID before the window is mapped (shown). For this, the following routine can be used
   Window fl_prepare_form_window(FL_FORM *form, int place,
                                 int border, const char *name)
This routine creates a window that obeys any and all constraints
just as fl_show_form does but remains unmapped. To map
such a window, the following must be used
Window fl_show_form_window(FL_FORM *form)
Between these two calls, the application program has full access to
the window and can set all attributes, such as icon pixmaps
etc.,
that are not set by fl_show_form().
You can also scale the form and all objects on it programmatically using the following routine
void fl_scale_form(FL_FORM *form,double xsc,double ysc)
Where you indicate a scaling factor in the x- and y-direction with respect to the current size. See rescale.c for an example.
When a form is scaled, either programmatically or interactively, all objects on the form will also be scaled. This includes both the size and position of the object. For most cases, this default behavior is adequate. In some cases, e.g., keeping a group of objects together, more control is needed. To this end, the following routines can be used
   void fl_set_object_gravity(FL_OBJECT *ob,
                             unsigned NWgravity, unsigned SEgravity)

   void fl_set_object_resize(FL_OBJECT *ob, unsigned howresize)
where howresize can be one of FL_RESIZE_NONE,
FL_RESIZE_X or FL_RESIZE_Y with obvious meanings.
An alias FL_RESIZE_ALL, defined to be
FL_RESIZE_X|FL_RESIZE_Y, can be used to make both dimension scalable.
NWgravity and SEgravity control respectively the positioning of the upper-left and lower-right corner of the object and work analogously to the win_gravity in Xlib. The details are as follows: Let P be the corner the gravity applies to, (dx1,dy1) the distance to the upper-left corner of the form, (dx2,dy2) the distance to the lower-right corner of the form, then,
| Value | Effect | |
| FL_NoGravity | Default linear scaling. See below | |
| FL_NorthWest | dx1, dy1 constant | |
| FL_North | dy1 constant | |
| FL_NorthEast | dy1, dx2 constant | |
| FL_West | dx1 constant | |
| FL_East | dx2 constant | |
| FL_SouthWest | dx1, dy2 constant | |
| FL_South | dy2 constant | |
| FL_SouthEast | dx2, dy2 constant |

Figure 4.1: Object gravity (NWgravity Shown)
Default for all object is FL_RESIZE_ALL and ForgetGravity.
Note that the three parameters are not orthogonal and the positioning
request will always override the scaling request in case of
conflict. This means FL_RESIZE is consulted only if
one (or both) of the gravities is FL_NoGravity.
For the special case where howresize is FL_RESIZE_NONE
and both gravities are set to ForegetGravity, the object is
left un-scaled, but the object is moved so that the new position
keeps the center of gravity of the object constant relative to the form.
Again, since all sizing requests go though the window manager, there is
no guarantee that your request will be honored. If a form is placed
with Fl_PLACE_GEOMETRY or other size-restricting options,
resizing later via fl_set_form_size will likely be rejected.
Multiple forms can be shown at the same moment and the system will interact will all of them simultaneously.
The graphical mode in which the form is shown depends on the type of machine. In general, the visual chosen by XForms is the one that has the most colors. Application programs have many ways to change this default, either through command line options, resources or programmatically. See the appendices for details.
If for any reason, you would like to change the form title (as well as its associated icon) after it is shown, the following call can be used
void fl_set_form_title(FL_FORM *form, const char *name)
To set or change the icon shown when a form is iconified, use the following routine
void fl_set_form_icon(FL_FORM *form, Pixmap icon, Pixmap mask)
where icon and mask can be any valid Pixmap ID. (See Sections 15.5 and 15.6 for some of the routines that can be used to create Pixmaps) Note that the previous icon, if exists, is not freed or modified in anyway. See demo program iconify.c for an example.
If the application program wants to stop interaction with a form and remove it from the screen, it has to use the call
void fl_hide_form(FL_FORM *form)
To check if a form is visible or not, use the following call
int fl_form_is_visible(FL_FORM *form)
Note that if you don't need a form anymore you can deallocate its memory
using the call
fl_free_form()
described earlier.
Window managers typically have a menu entry labeled ``delete''
or ``close" meant to terminate an application program gently
by informing the application program with a WM_DELETE_WINDOW protocol
message.
Although the Forms Library catches this message, it does not do
anything except terminating the application.
This can cause problems if the application has to do some record keeping
before exiting. To perform any record keeping or elect to ignore this
message, register a callback function using the following routine
int fl_set_atclose(int (*at_close)(FL_FORM *, void *), void *data)
The callback function at_close will be called before
the Forms Library terminates the application. The first parameter
of the callback function is the form that received the
WM_DELETE_WINDOW message.
To prevent the Forms Library from terminating the application, the callback function
should return a constant
FL_IGNORE.
Any other value (e.g.,FL_OK) will
result in the termination of the application.
Similar mechanism exists for individual forms
   int fl_set_form_atclose(FL_FORM *,
                      int (*at_close)(FL_FORM *, void *),
                      void *data)
except that FL_OK does not terminate the application, it
results in the form being closed. Of course, if you'd like
to terminate the application, you can always call exit(3)
yourself within the callback function.
Once one or more forms are shown it is time to give the control to the library to handle the interaction with the forms. There are a number of different ways of doing this. The first one, appropriate for simple programs, is to call
FL_OBJECT *fl_do_forms()
It controls the interaction until some object in one of the forms changes state. In this case a pointer to the changed object is returned. A change occurs in the following cases:
fl_do_forms().
When the object is returned by fl_do_forms() the application program
can check what the change is and take action accordingly. See some of the
demo programs for examples of use. Normally, after the action is taken
by the application program fl_do_forms() is called again to continue
the interaction. Hence, most programs have the following global
form:
   /* define the forms */
   /* display the forms */
   while (! ready)
   {
       obj = fl_do_forms();
       if(obj == obj1)
       /* handle the change in obj1 */
       else if (obj == obj2)
       /* handle the change in obj2 */
      ....
   }
For moderately complex programs, interaction via callbacks is preferred. For such programs, the global structure looks something like the following
   /* define callbacks */
   void callback(FL_OBJECT *ob, long data)
   {
      /* perform tasks */
   }

   void terminate_callback(FL_OBJECT *ob, long data)
   {
      /* cleanup application */
      fl_finish();
      exit(0);
   }

   main(int argc, char *argv[])
   {
     /* create form and bind the callbacks to objects */
     /* enter main loop */
     fl_do_forms();
    }
In this case, fl_do_forms() handles the interaction
indefinitely and never returns. Program exits via one of the
callback functions.
The interaction mentioned above is adequate for many application programs but not for all. When the program also has to perform tasks when no user action takes place (e.g. redrawing a rotating image all the time), some other means of interaction are needed.
There exist two different, but somewhat similar, mechanisms in the library that are designed specifically for generating and handling periodic events or achieving non-blocking interaction. Depending on the application, one method may be more appropriate than the other.
For periodic tasks, e.g., rotating an image, checking the status of some external device or application state etc., interaction via an idle callback comes in very handy. An idle callback is an application function that is registered with the system and is called whenever there are no events pending for forms (or application windows).
To register an idle callback, use the following routine
    FL_APPEVENT_CB
    fl_set_idle_callback(FL_APPEVENT_CB callback, void *user_data)
After the registration, whenever the main loop (fl_do_forms())
is idle, i.e., no user action or light user action, the callback
function is called as the following
int callback(xev, user_data);
Where user_data is the void pointer passed
to the system in fl_set_idle_callback() through
which some information about the application can be passed.
The return value of the callback function is currently
not used.
xev is a pointer to a
synthetic![]()
MotionNotify event from which some information about
mouse position etc. can be obtained. To remove the idle callback,
use fl_set_idle_callback() with callback set to 0.
Timeouts are similar to idle callbacks but with somewhat more accurate timing. Idle callbacks are called whenever the system is idle, the time interval between any two invocations of the idle callback can vary a great deal depending upon many factors. Timeout callbacks, on the other hand, will never be called before the specified time is elapsed. You can think of timeouts as regularized idle callbacks, and further you can have more than one timeout callbacks.
To add a timeout callback, use the following the routine
   typedef void (*FL_TIMEOUT_CALLBACK)(int, void *)
   int fl_add_timeout(long msec,
                      FL_TIMEOUT_CALLBACK callback, void *data)
The function returns the timeout ID. When the time interval specified by msec (in milli-second) is elapsed, the timeout is removed, then the callback function is called.
To remove a timeout before it triggers, use the following routine
void fl_remove_timeout(int ID)
where ID is the timeout ID returned by fl_add_timeout().
See demo program preemptive.c for an example use (implementing
tool tips ) of fl_add_timeout().
There is also an FL_OBJECT, the FL_TIMER object,
especially the invisible type, that can be used to do timeout.
Since it is a proper Forms Library object, it may be easier to use simply
because it has the same API as any other GUI elements and is
supported by the Form Designer. See Part iii for complete
information on FL_TIMER object.
Note that idle callback and timeout are not appropriate for tasks that block or take a long time to finish because during the busy or blocked period, no interaction with the GUI can take place (both idle callback and timeout are invoked by the main loop, blockage or busy executing application code prevents the main loop from performing its tasks).
So what to do in situations where the application program does require a lengthy computation while still wanting to have the ability to interact with the user interface (for example, a Stop button to terminate the lengthy computation) ?
In these situations, the following routine can be used:
FL_OBJECT *fl_check_forms()
This function is similar to fl_do_forms() in that
it takes care of handling the events and appropriate
callbacks, but it does not block. It always returns to the application
program immediately. If a change has occurred in some object
the object is returned as with fl_do_forms(). But when no change
has occurred control is also returned but this time a NULL object
is returned. Thus, by inserting this statement in the
middle of the computation in appropriate places in effect
``polls" the user interface. The downside of using
this function is that if used excessively, as with all excessive
polls, it can chew up considerable CPU cycles. Therefore,
it should only be used outside the inner most loops of the
computation. If all objects have callbacks bound to them,
fl_check_forms() always returns null, otherwise,
code similar to the following is needed:
   obj = fl_check_forms();
   if(obj == obj1)
    /* handle it */
   ...
Depending on the applications, it may be possible to partition the
computation into smaller tasks that can be performed within an idle
callback one after another, thus eliminating the need of using
fl_check_forms().
Handling intensive computation while maintaining user interface responsiveness can be tricky and by no means the above methods are the only options. You can, for example, fork a child process to do some of the tasks and communicate with the interface via pipes and/or signals, both of which can be handled with library routines documented later, or use multi-thread (but be careful to limit X server access within one thread). Be creative and have fun.
For running external executables while maintaining
interface responsiveness, see fl_exe_command()
documented later in Section 6.2(![]() ).
).
It is not atypical that an application program may need to take interaction from more than one form at the same time, Forms Library provides a mechanism with which precise control can be exercised.
By default,
fl_do_forms()
takes interaction from all forms
that are shown. In certain situations, you might not want to have
interaction with all of them. For example, when the user presses a
quit button in a form you might want to ask a confirmation using
another form. You don't want to hide the main form because of that
but you also don't want the user to be able to press buttons, etc. in
this form. The user first has to give the confirmation. So you want to
temporarily deactivate the main form. This can be done using the call
void fl_deactivate_form(FL_FORM *form)
To reactivate the form later again use
void fl_activate_form(FL_FORM *form)
It is a good idea to give the user a visual clue
that a form is deactivated. This is not automatically done mainly
for performance reasons. Experience shows that graying out
some important objects on the form is in general adequate.
Graying out an object can be accomplished by using fl_set_object_lcol()
(See objinactive.c). What objects to gray out is obviously application
dependent.
The following two functions can be used to register two callbacks that that are called whenever the activation status of a form is changed:
   typedef void (*FL_FORM_ATACTIVATE)(FL_FORM *, void *);

   FL_FORM_ATACTIVATE fl_set_form_atactivate(FL_FORM *form,
             FL_FORM_ATACTIVATE callback, void *data);

   typedef void (*FL_FORM_ATDEACTIVATE)(FL_FORM *, void *);
   FL_FORM_ATDEACTIVATE fl_set_form_atdeactivate(FL_FORM *form,
             FL_FORM_ATDEACTIVATE callback, void *data);
It is also possible to deactivate all current forms and reactivate them again. To this end use the calls:
   void fl_deactivate_all_forms()

   void fl_activate_all_forms()
Note that deactivation works in an additive way, i.e., when deactivating a form say 3 times it also has to be activated 3 times to become active again.
One problem remains. Mouse actions etc. are presented to a program in the
form of events in an event queue. The library routines fl_do_forms()
and fl_check_forms() read this queue and handle the events. When the
application program itself also opens windows, these windows should receive
events as well. Unfortunately, there is only one event queue. When both the
application program and the library routines read events from this one
queue problems occur and events are missed. Hence, the application program
should not read the event queue while displaying forms. To solve this
problem, the package maintains (or appears to maintain) a separate event
queue for the user. This queue behaves in exactly the same way as the
normal event queue. To access it, the application program should use
replacements for the usual Xlib routines. Instead of using
XNextEvent(), the program should use fl_XNextEvent(),
with the same parameters except the Display *.
The following is a list of all new routines:
   int fl_XNextEvent(XEvent *xev);
   int fl_XPeekEvent(XEvent *xev);
   int fl_XEventsQueued(int mode);
   int fl_XPutbackEvent(XEvent *xev);
Other events routines may be directly used if proper care is taken
to make sure that only events for the application window in question are
removed. These routines include XWindowEvent,
XCheckWindowEvent etc.
To help find out when an event has occurred,
whenever fl_do_forms()
and fl_check_forms()
encounter an
event that is not meant for them but for the application program they return
a special object FL_EVENT.
Upon receiving this special event, the application program can and
must remove the pending event from the
queue using
fl_XNextEvent().
So the basis of a program with its own windows would look as follows:
   /* define the forms */
   /* display the forms */
   /* open your own window(s) */
   while (! ready)
   {
       obj = fl_do_forms(); /* or fl_check_forms() */
       if (obj == FL_EVENT)
       {
          fl_XNextEvent(&xevent);
          switch(xevent.type)
          {
          /* handle the event */
          }
       }
       else if (obj != NULL)
         /* handle the change in obj */
     /* update other things */
    }
In some situations you don't want to see the user events. For example, you
might want to write a function that pops up a form to change some
settings. This routine might not want to be concerned with any redrawing
of the main window, etc., but you also don't want to discard any events.
In this case you can use the routines
fl_do_only_forms()
and
fl_check_only_forms()
that will never return FL_EVENT. The events don't disappear.
They will be returned at later calls to the normal
routines fl_do_forms().
It can't be over-emphasized that it is an error to ignore
FL_EVENT or use fl_XNextEvent() without
seeing FL_EVENT.
Sometimes an application program might need to find out more information on the event that triggered a callback, e.g., to implement button number sensitive functionalities. To this end, the following routines may be called
long fl_mouse_button(void)
This function, if needed, should be called from within a callback.
The function turns one of the constants
FL_LEFT_MOUSE, FL_MIDDLE_MOUSE and FL_RIGHT_MOUSE
indicating the physical location of the mouse button on the mouse
that is pushed or released.
If the callback is triggered by a shortcut, the function
returns the keysym (ascii value if ASCII) of the key plus
FL_SHORTCUT. For example, if a button has a shortcut <CNTRL> C,
the button number returned upon activation of the shortcut
would be FL_SHORTCUT 3+. FL_SHORTCUT can be used
to determine if the callback is triggered by a shortcut or not
   if(fl_mouse_button() >= FL_SHORTCUT)
    /shortcut */
   else
     switch(fl_mouse_button())
     {
       case FL_LEFTMOUSE:
          ...
     }
More information can be obtained by using the following routine that returns the last XEvent
const XEvent *fl_last_event(void)
Note that if this routine is used outside of a callback function,
the value returned may not be the real ``last event'' if
the program was idling and in this case, it returns a
synthetic MotionNotify event.
Some of the utilities used internally by the Forms Library can be used by the application programs, such as window geometry queries etc. Following is a partial list of the available routines:
   void fl_get_winorigin(Window win, FL_Coord *x, FL_Coord *y);

   void fl_get_winsize(Window win, FL_Coord *w, FL_Coord *h);

   void fl_get_wingeometry(Window win, FL_Coord *x, FL_Coord *y,
                            FL_Coord *w, FL_Coord *h);
All positions are relative to the root window.
There are also routines that can be used to obtain the current mouse position relative to the root window:
Window fl_get_mouse(FL_Coord *x, FL_Coord *y, unsigned int *keymask)
where keymask is the same as used in XQueryPointer(3X11). The function returns the window ID the mouse is in.
To obtain the mouse position relative to an arbitrary window, the following routine may be used
   Window fl_get_win_mouse(Window win, FL_Coord *x, FL_Coord *y,
                           unsigned int *keymask)
To print the name of an XEvent, the following routine can be used:
XEvent *fl_print_xevent_name(const char *where, const XEvent *xev)
The function takes an XEvent, prints out its name and some other info, e.g., expose, count=n. Parameter where can be used to indicate where this function is called:
fl_print_xevent_name("In tricky.c",&xevent);
As stated earlier, the recommended method of interaction is to use callback functions. A callback function is a function supplied to the library by the application program that binds a specific condition (e.g., a button is pushed) to the invocation of the function by the system.
The application program can bind a callback routine
to any object. Once a callback function is bound and the
specified condition is met,
fl_do_forms() or fl_check_forms() invokes
the callback function instead of returning the object.
To bind a callback routine to an object, use the following
   typedef void (*FL_CALLBACKPTR)(FL_OBJECT *ob, long argument);
   FL_CALLBACKPTR fl_set_object_callback(FL_OBJECT *obj,
                                   FL_CALLBACKPTR callback,
                                   long argument)
where callback is the callback function. argument is an argument that is passed to the callback routine so that it can take different actions for different objects. Function returns the old callback routine already bound to the object. You can change the callback routine anytime using this function. See, for example, demo program timer.c.
The callback routine should have the form
void callback(FL_OBJECT *obj,long argument)
The first argument to every callback function is the
object to which the callback is bound. The second parameter is the argument
specified by the application program in the call to
fl_set_object_callback().
See program demo09.c for an example of the use of callback routines. Note that callback routines can be combined with normal objects. It is possible to change the callback routine at any moment.
Sometimes it is necessary to access other objects on the form from within
the callback function. This presents a difficult situation that calls for
global variables for all the objects on the form. This runs against good
programming methodology and can make a program hard to maintain. Forms
Library solves (to some degree) this problem by creating three fields,
void *u_vdata, char *u_cdata and long
u_ldata, in the FL_OBJECT structure that you can use to
hold the necessary data to be used in the callback function. Better and more
general solution to the problem is detailed in Part ii of this documentation where all objects
on a form is grouped into a single structure which can then be ``hang"
off of u_vdata or some field in the FL_FORM structure.
Another communication problem might arise when the callback function is
called and from within the callback function, some other objects' state is
explicitly changed, say, via
fl_set_button,fl_set_input etc. You probably don't
want to put the state change handling code of these objects in another
object's callback. To handle this situation, you can simply call
void fl_call_object_callback(FL_OBJECT *obj)
When dealing with multiple forms, the application program can also bind a callback routine to an entire form. To this end it should use the routine
   void fl_set_form_callback(FL_FORM *form,
                       void (*callback)(FL_OBJECT *, void *), void *data)
Whenever fl_do_forms() or
fl_check_forms() would return an object in form they call the
routine callback instead, with the object as an argument.
So callback should have the form
void callback(FL_OBJECT *obj, void *data)
With each form you can associate its own callback routine. For objects that have their own callbacks, the object callbacks have priority over the form callback.
When the application program also has its own windows
(via Xlib or Xt), it most likely also
wants to know about XEvent for the window.
As explained earlier, this can be accomplished by checking for
FL_EVENT objects.
Another way (and better) is to add an event callback routine. This routine
will be called whenever an XEvent is pending for the application's own window.
To setup an event callback routine use the call
   FL_APPEVENT_CB
   fl_set_event_callback(int (*callback)(XEvent *ev, void *data),
                        void *data)
Whenever an event takes place callback is called with the event as argument. So callback should have the form
   typedef int (*FL_APPEVENT_CB)(XEvent *ev, void *data);
   int callback(XEvent *xev, void *data);
This assumes the application program solicits the events and further, the callback routine should be prepared to handle all XEvent for all non-form windows. This could be undesirable if more than one application window is active. To further partition and simplify the interaction, callbacks for a specific event on a specific window can be registered:
   FL_APPEVENT_CB fl_add_event_callback(Window window, int xev_type,
                             FL_APPEVENT_CB callback, void *user_data);
Where window is the window for which the callback routine is to
be registered.
xev_type is the XEvent type you're interested in, e.g.,
Expose etc. If xev_type is 0, it is taken to mean
the callback routine will handle all events for the window. The newly
installed callback replaces the callback already installed. Note that
this function only works for windows created directly
by the application program (i.e., it won't work for forms' windows
or windows created by the canvas object).
It is possible to access the raw events that happen on a form's
window via fl_register_raw_callback()
discussed in Chapter D
fl_add_event_callback() does not alter the window's event mask
nor solicit events for you. This is so mainly for the reason that an event
type does not always correspond to a unique event mask, also in this way,
the user can solicit events at window's creation and use 0 to register all
the event handlers.
To let XForms handle solicitation for you, call the following routine
void fl_activate_event_callbacks(Window win)
This function activates the default mapping of events
to event masks built-in in the Forms Library, and causes the system
to solicit the events for you. Note however, the mapping
of events to masks are not unique and depending
on applications, the default mapping may or may not be
the one you want. For example, MotionNotify event
can be mapped into ButtonMotionMask or
PointerMotionMask. Forms Library will use both.
It is possible to control precisely the masks you want by using the following function, which can also be used to add or remove solicited event masks on the fly without altering other masks already selected:
   long fl_addto_selected_xevent(Window win, long mask)

   long fl_remove_selected_xevent(Window win, long mask)
Both functions return the resulting event masks that are currently selected.
If event callback functions are registered via both
fl_set_event_callback() and
fl_add_event_callback(), the callback via the latter
is invoked first and the callback registered via
fl_set_event_callback() is called only if
the first attempt is unsuccessful, that is, the handler
for the event is not present. For example, after the following
sequence
    fl_add_event_callback(WinID, Expose, expose_cb, 0);
    fl_set_event_callback(event_callback);
All Expose events on window WinID are consumed by expose_cb, thus event_callback would never be invoked as a result of an Expose event.
To remove a callback, use the following routine
void fl_remove_event_callback(Window win, int xev_type)
All parameters have the usual meaning. Again, this routine does not modify
the window's event mask. If you like to change the events the window is
sensitive to after removing the callback, use
fl_activate_event_callbacks(). If xev_type is 0, all
callbacks for window win are removed. This routine is called
automatically if fl_winclose() is
called to unmap and destroy a window. Otherwise, you must call this routine
explicitly to remove all event callbacks before destroying a window using
XDestroyWindow(). .
A program using all of these has the following basic form:
   void event_cb(XEvent *xev, void *mydata1)
   { /* Handles an X-event. */ }

   void expose_cb(XEvent *xev, void *mydata2)
   { /* handle expose */ }

   void form1_cb(FL_OBJECT *obj)
   { /* Handles object obj in form1. */ }

   void form2_cb(FL_OBJECT *obj)
   { /* Handles object obj in form2. */ }

   main(int argc, char *argv[])
   {
      /* initialize             */
      /* create form1 and form2 and display them */
      fl_set_form_callback(form1,form1cb);
      fl_set_form_callback(form2,form2cb);
      /* create your own window, winID and show it */
      fl_addto_selected_xevent(winID, ExposureMask|ButtonPressMask|...)
      fl_winshow(winID);
      fl_set_event_callback(event_cb, whatever);
      fl_add_event_callback(winID,Expose, expose_cb, data);
      fl_do_forms();
   }
The routine fl_do_forms()
will never return in this case.
See demo27.c for a program that works this way.
It is recommended that you set up your programs using callback routines (either for the objects or for entire forms). This ensures that no events are missed, events are treated in the correct order, etc. Note that different event callback routines can be written for different stages of the program and they can be switched when required. This provides a progressive path for building up programs.
Another possibility is to use a free object so that the application window is handled automatically by the internal event processing mechanism just like any other forms.
It is not uncommon that X applications may require input from sources other than the X event queue. Outlined in this section are two routines in the Forms Library that provide a simple interface to handle additional input sources. Applications can define input callbacks to be invoked when input is available from a specified file descriptor.
The function
   typedef void (*FL_IO_CALLBACK)(int fd, void *data)
   void fl_add_io_callback(int fd, unsigned condition,
                           FL_IO_CALLBACK callback, void *data)
registers an input callback with the system. The argument fd must be a valid file descriptor on a UNIX-based system or other operating system dependent device specification while condition indicates under what circumstance the input callback should be invoked. The condition must be one of the following constants
| FL_READ | File descriptor has data available. |
| FL_WRITE | File descriptor is available for writing. |
| FL_EXCEPT | an I/O error has occurred. |
When the given condition occurs, the Forms Library invokes the callback function specified by callback. The data argument allows the application to provide some data to be passed to the callback function when it is called (be sure that the storage pointed to by data has global (or static) scope).
To remove a callback that is no longer needed or to stop the Forms Library's main loop from watching the file descriptor, use the following function
   void fl_remove_io_callback(int fd, unsigned condition,
                              FL_IO_CALLBACK callback)
The procedures outlined above work well with pipes and sockets, but can be a CPU hog on real files. To workaround this problem, you may wish to check the file periodically and only from within an idle callback.
In some applications the standard object classes as provided by the Forms Library may not be enough for your task. There are three ways of solving this problem. First of all, the application program can also open its own window or use a canvas (the preferred way) in which it does interaction with the user. (See chapter 4.) A second way is to add your own object classes. (See Part iv of this document.) This is especially useful when your new type of objects is of general use.
The third way is to add free objects to your form. Free objects are objects for which the application program handles the drawing and interaction. This chapter will give all the details needed to design and use free objects.
To add a free object to a form use the call
   FL_OBJECT *fl_add_free(int type,FL_Coord x,FL_Coord y,
            FL_Coord w,FL_Coord h, const char *label,int (*handle)())
type indicates the type of free object. See below for a list and their meaning. x, y, w and h are the bounding box. The label is normally not drawn unless the handle routine takes care of this. handle is the routine that does the redrawing and handles the interaction with the free object. The application program must supply this routine.
This routine handle is called by the library whenever an action has to be performed. The routine should have the form:
   int handle(FL_OBJECT *obj, int event, FL_Coord mx, FL_Coord my,
             int key, void *xev)
where obj is the object to which the event applies. event
indicates what has to happen to the object. See below for a list of
possible events. mx and my indicate the position of the
mouse (only meaningful with mouse related events) relative
to the form origin and key is the
KeySym of the key typed in by the user
(only for FL_KEYBOARD events). xev is the (cast)
XEvent that causes the invocation of this handler. event
and xev->type can both be used to obtain the event types.
The routine should return whether
the status of the object has changed, i.e., whether fl_do_forms()
or fl_check_forms() should return this object.
The following types of events exist for which the routine must take action:
obj->x, obj->y,
obj->w and obj->h. Some other
aspects might also influence the way the object has to be drawn. E.g.,
you might want to draw the object differently when the mouse is on top
of it or when the mouse is pressed on it. This can be figured out as
follows. The field obj->belowmouse indicates whether
the object is below the mouse. The field
obj->pushed indicates whether the object
is currently being pushed with the mouse. Finally,
obj->focus
indicates whether input focus is directed towards this
object. When required, the label should also be drawn. This label
can be found in the field
obj->label.
The drawing should be done such that it works correctly in the visual/depth
the current form is in. Complete information is available on the state
of the current form as well as several routines that will help you
to tackle the trickiest (also the most tedious) part of X programming.
In particular, the return value of fl_get_vclass()
can be
used as an index into a table of structures, FL_STATE fl_state[],
from which all information about current active visual can be obtained.
See chapter 26 for details on drawing objects and the routines.
FL_DRAW and indicates
the object label needs to be (re)drawn. You can ignore this
event if (a) the object handler always draws the label
upon receiving FL_DRAW or (b) the object label is
not drawn at all
fl_redraw_object(). It will send an FL_DRAW
event to the object
but also does some other things (like setting window id's,
taking care of double buffering and some other bookkeeping tasks).
FL_ENTER
and FL_LEAVE events when the mouse position
changes on the object.
The mouse position is given with the routine.
FL_CLICK_TIMEOUT).
FL_DBLCLICK, FL_PUSH, FL_RELEASE sequence.
FL_PUSH and an FL_RELEASE event (actually
this event is sent periodically, even if mouse has not
moved). The mouse position is given as the parameter
mx and my and action can be taken based on the position.
FL_INPUT_FREE (see
below).
FL_FOCUS
and FL_UNFOCUS events.
FL_CONTINUOUS_FREE such that it can update its state or appearance.
Many of these events might make it necessary to (partially) redraw the object.
Always do this using the routine fl_redraw_object().
As indicated above not all events are sent to all free objects. It depends
on their types. The following types exist (all objects are sent
FL_OTHER when it occurs):
FL_DRAW, FL_ENTER,
FL_LEAVE, FL_MOTION, FL_PUSH, FL_RELEASE
and FL_MOUSE.
FL_DRAW events. This should be used
for objects without interaction (e.g. a picture).
FL_NORMAL_FREE but the object also receives
FL_FOCUS, FL_UNFOCUS and FL_KEYBOARD
events.
The obj->wantkey is by default set to
FL_KEY_NORMAL, i.e., the free object
will receive all normal keys (0-255) except
<TAB> and <RETURN> key. If you're interested in
<TAB> or <RETURN> key, you need to change
obj->wantkey to FL_KEY_TAB or FL_KEY_ALL.
See
FL_NORMAL_FREE but the object also
receives FL_STEP events.
This should be used for objects that change themselves continuously.
See free1.c for a (terrible) example of the use of free objects. See also freedraw.c, which is a nicer example of the use of free objects.
Free objects provide all the generality you want from the Forms Library. Because free objects behave a lot like new object classes it is recommended that you also read part IV of this documentation before designing free objects.
We conclude our discussion of the free object by examining a simple drawing program capable of drawing simple geometric figures like squares, circles, and triangles of various colors and sizes, and of course it also utilizes a free object.
The basic UI consists of three logical parts. A drawing area onto which the squares etc. are to be drawn; a group of objects that control what figure to draw and with what size; and a group of objects that control the color with which the figure is to be drawn.
The entire UI (see Fig. 5.1) is designed interactively using the GUI builder fdesign with most objects having their own callbacks. fdesign writes two files, one is a header file containing forward declarations of callback functions and other function prototypes:
   #ifndef FD_drawfree_h_
   #define FD_drawfree_h_

   extern void change_color(FL_OBJECT *, long);
   extern void switch_figure(FL_OBJECT *, long);
   /* more callback declarations omitted */

   typedef struct {
        FL_FORM *drawfree;
        FL_OBJECT *freeobj;
        FL_OBJECT *figgrp;
        FL_OBJECT *colgrp;
        FL_OBJECT *colorobj;
        FL_OBJECT *rsli;
        FL_OBJECT *gsli;
        FL_OBJECT *bsli;
        FL_OBJECT *miscgrp;
        FL_OBJECT *sizegrp;
        FL_OBJECT *hsli;
        FL_OBJECT *wsli;
        FL_OBJECT *drobj[3];
        void *vdata;
        long ldata;
   } FD_drawfree;

   extern FD_drawfree *create_form_drawfree(void);
   #endif /* FD_drawfree_h_ */
The other file contains the actual C-code that creates the
form when compiled and executed.
Since free object is not directly supported by fdesign, a box was
used as a stub for the location and size of the drawing
area.
After the C-code was generated, the box was changed manually
to a free object by replacing fl_add_box(FL_DOWN_BOX ...)
with fl_add_free(FL_NORMAL_FREE,...). We list below the output
generated by fdesign with some comments:
   FD_drawfree *create_form_drawfree(void)
   {
     FL_OBJECT *obj;
     FD_drawfree *fdui = (FL_drawfree *)fl_calloc(1, sizeof(FD_drawfree));

     fdui->drawfree = fl_bgn_form(FL_NO_BOX, 530, 490);
     obj = fl_add_box(FL_UP_BOX,0,0,530,490,"");
This is almost always the same for any form definition: we allocate
a structure that will hold all objects on the form as well as the
form itself. In this case, the first object on the form is
a box of type FL_UP_BOX.
     fdui->figgrp = fl_bgn_group();
     obj = fl_add_button(FL_RADIO_BUTTON,10,60,40,40,"@#circle");
       fl_set_object_lcol(obj,FL_YELLOW);
       fl_set_object_callback(obj,switch_figure,0);
     obj = fl_add_button(FL_RADIO_BUTTON,50,60,40,40,"@#square");
       fl_set_object_lcol(obj,FL_YELLOW);
       fl_set_object_callback(obj,switch_figure,1);
     obj = fl_add_button(FL_RADIO_BUTTON,90,60,40,40,"@#8>");
       fl_set_object_lcol(obj,FL_YELLOW);
       fl_set_object_callback(obj,switch_figure,2);
     fl_end_group();
This creates three buttons that control what figures are
to be drawn. Since figure selection is mutually exclusive,
we use RADIO_BUTTON for this. Further, the three buttons
are placed inside a group so that they won't interfere with other
radio buttons on the same form. Notice that
callback function switch_figure() is bound to
all three buttons but with different
arguments.
The callback function can resolve the associated object with the
callback function argument. In this case, 0 is used for
circle, 1 for square and 2 for triangle. This association of a callback
function with a piece of user data can often reduce coding substantially,
especially if you have a large group of objects that control similar things.
The advantage will become clear as we proceed.

Figure 5.1: Drawing using Free Object
Next we add three sliders to the form. By using appropriate colors for the sliding bar (Red, Green, Blue), there is no need to label the slider.
     fdui->colgrp = fl_bgn_group();
     fdui->rsli=obj=fl_add_slider(FL_VERT_FILL_SLIDER,25,170,30,125,"");
       fl_set_object_color(obj,FL_COL1,FL_RED);
       fl_set_object_callback(obj,change_color,0);
     fdui->gsli=obj=fl_add_slider(FL_VERT_FILL_SLIDER,55,170,30,125,"");
       fl_set_object_color(obj,FL_COL1,FL_GREEN);
       fl_set_object_callback(obj,change_color,1);
     fdui->bsli=obj=fl_add_slider(FL_VERT_FILL_SLIDER,85,170,30,125,"");
       fl_set_object_color(obj,FL_COL1,FL_BLUE);
       fl_set_object_callback(obj,change_color,2);
     fdui->colorobj = obj = fl_add_box(FL_BORDER_BOX,25,140,90,25,"");
       fl_set_object_color(obj,FL_FREE_COL1,FL_FREE_COL1);
     fl_end_group();
Again, a single callback function, change_color(), is bound
to all three sliders. In addition to the sliders, a box object
is added to the form. This box is set to use color index
FL_FREE_COL1 and will be used to show visually what the current
color setting looks like. This implies that in the
change_color() callback function, the entry
FL_FREE_COL1 in the Forms Library's internal colormap will
be changed. We also place all the color related objects inside
a group even though they are not of radio property. This is
to facilitate gravity settings which otherwise require
setting the gravities of each individual object.
Next we create our drawing area which is simply a free object
of type NORMAL_FREE with a handler to be written
     obj = fl_add_frame(FL_DOWN_FRAME,145,30,370,405,"");
       fl_set_object_gravity(obj, FL_NorthWest, FL_SouthEast);
     fdui->freeobj = obj = fl_add_free(FL_NORMAL_FREE,145,30,370,405,"",
                           freeobject_handler);
       fl_set_object_boxtype(obj, FL_FLAT_BOX);
       fl_set_object_gravity(obj, FL_NorthWest, FL_SouthEast);
The frame is added for decoration purpose only. Although a free object with a down box would appear the same, the down box can be written over by the free object drawing while the free object can't draw on top of the frame since the frame is outside of the free object. Notice the gravity settings. This kind setting maximizes the real estate of the free object when the form is resized.
Next, we need to have control over the size of the object. For this, added are two sliders bound to the same callback function with different user data (0 and 1 in this case):
     fdui->sizegrp = fl_bgn_group();
     fdui->wsli=obj=fl_add_valslider(FL_HOR_SLIDER,15,370,120,25,"Width");
       fl_set_object_lalign(obj,FL_ALIGN_TOP);
       fl_set_object_callback(obj,change_size,0);
     fdui->hsli=obj=fl_add_valslider(FL_HOR_SLIDER,15,55,410,25,"Height");
       fl_set_object_lalign(obj,FL_ALIGN_TOP);
       fl_set_object_callback(obj,change_size,1);
     fl_end_group();
The rest of the UI consists of some buttons the user can use
to exit the program, elect to draw outline instead of filled figures
etc. Form definition ends with fl_end_form(). The structure
that holds the form as well as all the objects on them is returned
to the caller:
     fdui->miscgrp = fl_bgn_group();
     obj = fl_add_button(FL_NORMAL_BUTTON,395,445,105,30,"Quit");
       fl_set_button_shortcut(obj,"Qq#q",1);
     obj = fl_add_button(FL_NORMAL_BUTTON,280,445,105,30,"Refresh");
       fl_set_object_callback(obj,refresh_cb,0);
     obj = fl_add_button(FL_NORMAL_BUTTON,165,445,105,30,"Clear");
       fl_set_object_callback(obj,clear_cb,0);
     fl_end_group();

     obj = fl_add_checkbutton(FL_PUSH_BUTTON,15,25,100,35,"Outline");
       fl_set_object_color(obj,FL_MCOL,FL_BLUE);
       fl_set_object_callback(obj,fill_cb,0);
       fl_set_object_gravity(obj,FL_NorthWest,FL_NorthWest);
     fl_end_form();
     return fdui;
After creating the UI, we need to write the callback functions and the free object handler. The callback functions are relatively easy since each object is designed to perform a very specific task.
Before we proceed to code the callback functions, we first need to define the overall data structure that will be used to glue together the UI and the routines that do real work.
The basic structure is the DrawFigure structure that holds the current drawing function as well as object attributes such as size and color:
   #define MAX_FIGURES   500
   typedef void (*DrawFunc)(int/*fill */, int,int,int,int,/* x,y,w,h */
                           FL_COLOR )    /* color   */
   typedef struct
   {
      DrawFunc drawit;      /* how to draw this figure */
      int fill, x,y,w,h;    /* geometry                */
      int pc[3];            /* primary color R,G,B     */
      int newfig;           /* indicate a new figure   */
      FL_COLOR col;         /* FL color index          */
   } DrawObject;

   static DrawFigure saved_figure[MAX_FIGURES], *cur_fig;
   static FD_drawfree *drawui;
   int max_w = 30, max_h = 30;   /* max size of figures */
All changes to the figure attributes will be buffered in
cur_fig and when the actual drawing command is issued
(mouse click inside the free object), cur_fig is copied into
saved_figure array buffer.
Forms Library contains some low-level drawing routines that can draw and optionally fill arbitrary polygonal regions, so in principle, there is no need to use Xlib calls directly. To show how Xlib drawing routine is combined with Forms Library, we use Xlib routines to draw a triangle:
   void draw_triangle(int fill, int x, int y, int w, int h, FL_COLOR col)
   {
        XPoint xp[4];
        GC gc = fl_state[fl_get_vclass()].gc[0];
        Window win = fl_winget();
        Display *disp = fl_get_display();

        xp[0].x = x;         xp[0].y = y + h - 1;
        xp[1].x = x + w/2;   xp[1].y = y;
        xp[2].x = x + w - 1; xp[2].y = y + h - 1;
        XSetForeground(disp, gc, fl_get_pixel(col));
        if(fill)
          XFillPolygon (disp, win, gc, xp, 3, Nonconvex, Unsorted);
        else
        {
            xp[3].x = xp[0].x; xp[3].y = xp[0].y;
            XDrawLines(disp, win, gc, xp, 4, CoordModeOrigin);
        }
   }
Although more or less standard stuff, some explanation is in order.
As you have probably guessed, fl_winget() returns the current
``active" window, defined to be the window the object receiving
dispatcher's messages (FL_DRAW e.g.) belongs to.![]() Similarly the routine
Similarly the routine fl_get_display() returns the current connection to
the X
server. Part iv has more details on the utility
functions in the Forms Library.
The structure fl_state[] keeps much ``inside" information
on the state of the Forms Library. For simplicity, we choose to use the
Forms Library's default GC. There is no fundamental reason that this has
be so. We certainly can copy the default GC and change the
foreground color in the copy. Of course unlike using the
default GC directly, we might have to set the clip mask
in the copy whereas the default GC always have the proper
clip mask (in this case, to the bounding box of the free
object).
We use the Forms Library's built-in drawing routines to draw circles and rectangles. Then our drawing functions can be defined as follows:
   static DrawFunc drawfunc[] =
   {
      fl_oval, fl_rectangle, draw_triangle
   };
Switching what figure to draw is just changing the member drawit in cur_fig. By using the proper object callback argument, figure switching is achieved by the following callback routine that is bound to all figure buttons
   void switch_object(FL_OBJECT *obj, long which)
   {
        cur_fig->drawit = drawfunc[which];
   }
So this takes care of the drawing functions.
Similarly, the color callback function can be written as follows
    void change_color(FL_OBJECT * ob, long which)
    {
       cur_fig->c[which] = fl_get_slider_value(ob) * 255;
       fl_mapcolor(cur_fig->col,cur_fig->c[0],cur_fig->c[1],cur_fig->c[2]);
       fl_mapcolor(FL_FREE_COL1,cur_fig->c[0],cur_fig->c[1],cur_fig->c[2]);
       fl_redraw_object(drawui->colorobj);
    }
The first fl_mapcolor defines the RGB components for index cur_fig->col and the second fl_mapcolor defines the RGB component for index FL_FREE_COL1, which is the color index used by colorobj that serves as current color visual feedback.
Object size is taken care of in a similar fashion by using a callback function bound to both size sliders:
   void change_size(FL_OBJECT * ob, long which)
   {
       if (which == 0)
             cur_fig->w = fl_get_slider_value(ob);
       else
             cur_fig->h = fl_get_slider_value(ob);
   }
Lastly, we toggle the fill/outline option by querying the state of the push button
   void outline_callback(FL_OBJECT *ob, long data)
   {
       cur_fig->fill = !fl_get_button(ob);
   }
To clear the drawing area and delete all saved figures, a Clear button is provided with the following callback:
   void clear_cb(FL_OBJECT *obj, long notused)
   {
        saved_figure[0] = *cur_fig; /* copy attributes */
        cur_fig = saved_figure;
        fl_redraw_object(drawui->freeobj);
   }
To clear the drawing area and redraw all saved figures, a Refresh button is provided with the following callback:
   void refresh_cb(FL_OBJECT *obj, long notused)
   {
       fl_redraw_object(drawui->freeobj);
   }
With all attributes and other services taken care of, it is time to write the free object handler. The user can issue a drawing command inside the free object by clicking either the left or right mouse button.
   int
   freeobject_handler(FL_OBJECT * ob, int event, FL_Coord mx, FL_Coord my,
                     int key, void *xev)
   {
       DrawFigure *dr;

       switch (event)
       {
       case FL_DRAW:
           if (cur_fig->newfig == 1)
              cur_fig->drawit(cur_fig->fill,
                              cur_fig->x + ob->x,cur_fig->y + ob->y,
                              cur_fig->w, cur_fig->h, cur_fig->col);
           else
           {
              fl_drw_box(ob->boxtype, ob->x, ob->y, ob->w, ob->h, ob->col1,
                         ob->bw);

              for (dr = saved_figure; dr < cur_fig; dr++)
              {
                 fl_mapcolor(FL_FREE_COL1, dr->c[0], dr->c[1], dr->c[2]);
                 dr->drawit(dr->fill,dr->x + ob->x,dr->y + ob->y,
                            dr->w,dr->h,dr->col);
              }
           }
           cur_fig->newfig = 0;
           break;
        case FL_PUSH:
           if (key != 2)
           {
              cur_fig->x = mx - cur_fig->w/2;
              cur_fig->y = my - cur_fig->h/2;

              /* convert figure center to relative to the free object*/
              cur_fig->x -= ob->x;
              cur_fig->y -= ob->y;

              cur_fig->newfig = 1;
              fl_redraw_object(ob);
              *(cur_fig+1) = *cur_fig;
              fl_mapcolor(cur_fig->col+1, cur_fig->c[0], cur_fig->c[1],
                          cur_fig->c[2],
              cur_fig++;
              cur_fig->col++;
           }
           break;
       }
       return 0;
   }
In this particular program, we are only interested in mouse
clicks and redraw. The event dispatching routine cooks
the X event and drives the handler via a set of events (messages).
For a mouse click inside the free object, its handler is
notified with an FL_PUSH together with the current mouse
position mx, my. In addition, the driver also
sets the clipping mask to the bounding box of the free object
prior to sending FL_DRAW.
Mouse position (always relative to the origin of the form)
is directly usable in the drawing function. However,
it is a good idea to convert the mouse position so it is
relative to the origin of the free object if the position
is to be used later. The reason for this is that
the free object can be resized or moved in ways unknown
to the handler and only the position relative to the
free object is meaningful in these situations.
It is tempting to call the drawing function in response
to FL_PUSH since it is FL_PUSH that triggers the drawing.
However, it is a (common) mistake to do this. The reason
is that much bookkeeping is performed prior to sending
FL_DRAW, such as clipping, double buffer preparation
and possibly active window setting etc. All of these is not
done if the message is other than FL_DRAW. So always use
fl_redraw_object() to draw unless it is a response
to FL_DRAW. Internally fl_redraw_object()
calls the handler with FL_DRAW (after some bookkeeping),
so we only need to mark FL_PUSH with a flag newfig and
let the drawing part of the handler draw the newly added figure.
FL_DRAW has two parts. One is simply to add a figure
indicated by newfig being true and in this
case, we only need to draw the figure that is being added.
The other branch might be triggered as a response
to damaged drawing area resulting from Expose
event or as a response to Refresh command. we
simply loop over all saved figures and (re)draw each of
them.
The only thing left to do is to initialize the program, which includes initial color and size, and initial drawing function. Since we will allow interactive resizing and also some of the objects on the form are not resizeable, we need to take care of the gravities.
    void draw_initialize(FD_drawfree *ui)
    {

       fl_set_form_minsize(ui->drawfree,530,490);
       fl_set_object_gravity(ui->colgrp, FL_West, FL_West);
       fl_set_object_gravity(ui->sizegrp, FL_SouthWest, FL_SouthWest);
       fl_set_object_gravity(ui->figgrp, FL_NorthWest, FL_NorthWest);
       fl_set_object_gravity(ui->miscgrp, FL_South, FL_South);
       fl_set_object_resize(ui->miscgrp, FL_RESIZE_NONE);

       cur_fig = saved_figure;
       cur_fig->pc[0] = cur_fig->pc[1] = cur_fig->pc[2] = 127;
       cur_fig->w = cur->fig->h = 30;
       cur_fig->drawit = fl_oval;
       cur_fig->col = FL_FREE_COL1 + 1;
       cur_fig->fill = 1;
       fl_set_button(ui->drobj[0], 1); /* show current selection */

       fl_mapcolor(cur_fig->col, cur_fig->pc[0],
                   cur->fig->pc[1], cur->fig->pc[2]);
       fl_mapcolor(FL_FREE_COL1, cur_fig->pc[0],
                   cur->fig->pc[1], cur->fig->pc[2]);

       fl_set_slider_bounds(ui->wsli, 1, max_w);
       fl_set_slider_bounds(ui->hsli, 1, max_h);
       fl_set_slider_precision(ui->wsli, 0);
       fl_set_slider_precision(ui->hsli, 0);
       fl_set_slider_value(ui->wsli, cur_fig->w);
       fl_set_slider_value(ui->hsli, cur_fig->h);

    }
With all the parts in place, the main program simply creates, initializes and shows the UI, then enters the main loop:
   int main(int argc, char *argv[])
   {
       fl_initialize(&argc, argv, "FormDemo", 0, 0);
       drawui = create_form_drawfree();
       draw_initialize(drawui);
       fl_show_form(drawui->drawfree, FL_PLACE_CENTER|FL_FREE_SIZE,
                   FL_FULLBORDER, "Draw");
       fl_do_forms();
       return 0;
   }
Since the only object that does not have a callback is the Quit
button, fl_do_forms() will return only if that button
is pushed.
Full source code to this simple drawing program can be found
in DEMOS/freedraw.c.
A number of special routines are provided that make working with simple forms even simpler. All these routines build simple forms and handle the interaction with the user.
The following routines are meant to give messages to the user and to ask simple questions:
void fl_show_message(const char *s1, const char *s2, const char *s3)
It shows a simple form with three lines of text and a button labeled OK on it. The form is so shown such that the mouse pointer is on the button.
Sometimes, it may be more convenient to use the following routine
void fl_show_messages(const char *str)
when the message is a single line or when you know the message in advance. Embed newlines in str to get multi-line messages.
Both of the message routines blocks execution and does not return immediately (but idle callback and asynchronous IO continue being run and checked). Execution continues when the OK button is pressed or <RETURN> is hit or when the message form is removed from the screen by the following routine (for example, triggered by a timeout or idle callback):
void fl_hide_message(void)
There is also a routine that can be used to show a one-line message that can only be removed programmatically
   void fl_show_oneliner(const char *str, FL_Coord x, FL_Coord y)

   void fl_hide_oneliner(void);
where str is the message and x and y are the coordinate (relative to the root window) the message should be placed. Note that multi-line message is possible by embedding the newline character in str. See the demo program preemptive.c for an example of its use.
By default, the background of the message is yellow and the text black. To change this default, use the following routine
void fl_set_oneliner_color(FL_COLOR background, FL_COLOR textcol)
Similar routine exists to change the font style and size
void fl_set_oneliner_font(int style, int size);
See also Section 21.3 for similar but potentially (different) multi-line message routines.
   void fl_show_alert(const char *s1,const char *s2,const char *s3,int c)

   void fl_hide_alert(void)
work the same as fl_show_messages() goodie except that an
alert icon (!) is added and the first string is shown bold-faced.
The extra parameter c controls whether to display the form centered
on the screen.
In combination with fl_add_timeout(), it is easy to
develop a timed alert routine that goes away when the user
pushes the OK button or when a certain time has elapsed:
    static void dismiss_alert(int ID, void *data)
    {
        fl_hide_alert();
    }

    void show_timed_alert(const char *s1, const char *s2,
                          const char *s3, int c)
    {
        fl_add_timeout(10000, dismiss_alert, 0); /* ten seconds */

        /* fl_show_alert blocks, and returns only when the OK button
            is pushed or when the timeout, in this case, 10second,
            has elapsed
        */
        fl_show_alert(s1,s2,s3,c);
    }
Then you can use show_timed_alert() just as fl_show_alert()
but with added functionality that the alert will remove itself
after 10 seconds even if the user does not push the OK button.
   int fl_show_question(const char *message, int def)

   void fl_hide_question(void);
Again shows a message (with possible embedded newlines in it) but this time with a Yes and a No button. def controls which button the mouse pointer should be on: 1 for Yes, 0 for No and any other value causes the form to be shown so the mouse pointer is at the center of the form. It returns whether the user pushed the Yes button. The user can also press the <Y> key to mean Yes and the <N> key to mean No.
If the question goodie is removed programmatically via
fl_hide_question(), the default def as given in
fl_show_question() is taken. If no default is set, 0 is
returned by fl_show_question(). The following code segment
shows one way of using fl_hide_question()
    void timeout_yesno(int id, void *data)
    {
       fl_hide_question();
    }

       ....

    fl_add_timeout(5000, timeout_yesno, 0);

    /* show_question blocks until either timeouts or
       one of the buttons is pushed
     */
    if(fl_show_question("Want to Quit ?", 1))
       exit(0);

    /* no is selected, continue */
     rest of the code
In the above example, the user is given 5 second to think if he wants
to quit. If within the 5 second, he can't decide what to do, the timeout
is triggered and fl_show_question() returns 1. If on the other hand,
before the timeout triggers, he pushes the button No,
fl_show_question() returns normally and
fl_hide_question() becomes a no-op.
   int fl_show_choice(const char *s1, const char *s2, const char *s3,
                     int numb,
                     const char *b1,const char *b2,const char *b3, int def)

   int fl_show_choices(const char *s, int numb,
                     const char *b1,const char *b2,const char *b3, int def)

   void fl_set_choices_shortcut(const char *s1, const char *s2,
                                const char *s3);

   void fl_hide_choice(void)
The first routine shows a message (up to three lines)
with one, two or three buttons. numb indicates the number of buttons.
b1, b2 and b3 are the labels of the buttons.
def can be 1,2 or 3 indicating the default choice.
The second routine is similar to the first except that
the message is passed as a single string with possible embedded
newlines in it.
Both routines return the number of the button pressed (1, 2 or 3). The
user can also press the <1>, <2> or <3> key to indicate the
first, second, or third button. More mnemonic hotkeys can be defined using
the shortcut routine, s1,s2 and s3 are the shortcuts to bind
to the three buttons. If the choice goodie is removed
by fl_hide_choice(), the default def is retuned.
To change the font used in all messages, use the following routine
void fl_set_goodies_font(int style, int size)
To obtain some text from the user, use the following routine
   const char *fl_show_input(const char *str1,const char *defstr)

   void fl_hide_input(void)
This shows a box with one line of message (indicated by str1), and an input field in which the user can enter a string. defstr is the default input string placed in the input box. In addition, three buttons, labeled Cancel, OK and Clear respectively, are added. Button Clear clears the input field. The routine returns the string in the input field when the user presses the OK button or presses the <RETURN> key. The function also returns when button Cancel is pressed. In this case, instead of returning the text in the input field, null is returned. This routine can be used to have the user provide all kinds of textual input.
Removing the input field programmatically results in
null returned by fl_show_input(), i.e., equivalent
to Cancel.
A similar but simpler routine can also be used to obtain textual input
const char *fl_show_simple_input(const char *str1,const char *defstr)
The form shown in this case only has the OK button.
The example program goodies.c.c shows you these goodies.
It is possible to change some of the built-in button labels via the following resource function with proper resource names
void fl_set_resource(const char *res_str, const char *value)
For example, to change the label of Dismiss button to ``Go'"
in the alert
form, code similar to the following can be used after fl_initialize
but before any use of the alert goodie:
fl_set_resource("flAlert.dismiss.label","Go");
Currently the following goodies resources are supported:
Note that all goodies are shown with FL_TRANSIENT and
not all window managers decorate such forms with titles. Thus
the title setting in the above listing may not apply.
In a number of situations, a GUI is created specifically to make an existing command-line oriented program easier to use. For stylistic considerations, you probably don't want to have the output (stderr and stdout) as a result of running the command printed on the terminal. Rather you want to log all the messages to a browser so the user can decide if and when to view the log. For this, a goodie is available
long fl_exe_command(const char *cmd, int block)
This function, similar to system(3) call, forks a new process that runs the command cmd, which must be a null-terminated string containing a shell command line. The output (both stderr and stdout) of cmd is logged into a browser, which can be presented to the user when appropriate (See below). The block argument is a flag indicating if the function should wait for the child process to finish. If the argument block is true, the function waits until the command cmd completes and then returns the exit status of the command cmd. If the argument block is false, the function returns immediately without waiting for the command to finish. In this case, the function returns the process ID of the child process or -1 if an error occurs.
Unlike other goodies, fl_exe_command() does not deactivate
other forms even in block mode. This means that the user can interact with
the GUI while fl_exe_command() waits for the child process to
finish. If this is not desired, you can use
fl_deactivate_all_forms() and
fl_activate_all_forms() to wrap the function.
If fl_exe_command() is called in non-blocking mode, the
following function should be called to clean up related process and resource
before the current parent process exits (otherwise zombie process may
result)
int fl_end_command(long pid)
where pid is the process ID returned by
fl_exe_command(). The function suspends the current process and
waits until the child process is completed, then it returns the exit status
of the child process or -1 if an error has occurred.
There is another routine that will wait for all the child processes
initiated by fl_exe_command() to complete
int fl_end_all_command(void)
The function returns the status of the last child process.
You can also poll the status of a child process using the following routine
int fl_check_command(long pid)
where pid is the process id returned by fl_exe_command().
The function returns the following values: 0 if the child process is finished; 1 if the child process still exists (running or stopped) and -1 if an error has occurred inside the function.
To show or hide the logs of the command output, use the following functions
   int fl_show_command_log(int border)

   void fl_hide_command_log(void);
where border is the same as that used in
fl_show_form(). These two routines can be called
anytime anywhere after fl_initialize().
The command log is by default placed at the top-right corner of the screen. To change the default placement, use the following routine
void fl_set_command_log_position(int x, int y);
where x and y are the coordinates of the upper-left corner of the form relative to the root window.
The logging of the output is accumulative, i.e.,
fl_exe_command() does not
clear the browser. To clear the browser, use the following
routine
void fl_clear_command_log(void)
It is possible to add arbitrary text to the command browser via the following routine
void fl_addto_command_log(const char *s)
where s is a null-terminated string with possible embedded
newlines. The string s is added to the browser
using fl_addto_browser_chars()
,
i.e., the string is appended to the last line in the browser.
Finally, there is a routine that can be used to obtain the GUI structure of the command browser
   typedef struct
   {
       FL_FORM *form;                 /* the form          */
       FL_OBJECT *browser;            /* the browser       */
       FL_OBJECT *close_browser;      /* the Close button  */
       FL_OBJECT *clear_browser;      /* the Clear button  */
   } FD_CMDLOG;

   FD_CMDLOG *fl_get_command_log_fdstruct();
From the information returned, the application program can change various attributes of the command browser and its associated objects. Note however, you should not hide/show the form or free any member of the structure.
In a number of applications the user has to select a color from the colormap. For this a goody has been created. It shows the first 64 entries of the colormap. The user can scroll through the colormap to see more entries. At the moment the user presses the mouse on some entry the corresponding index is returned and the colormap is removed from the screen. To display the colormap use the routine
int fl_show_colormap(int oldcol)
oldcol should be the current or default color. The user can decide not to change this color by pressing the cancel button in the form. The procedure returns the index of the color selected (or the index of the old color).
The most extended predefined form is the file selector. It provides an easy and interactive way to let the user select files. It is called as follows:
   const char * fl_show_fselector(const char *message,const char *directory,
                               const char *pattern,const char *default)
A form will be shown in which listed are all files in directory
directory that satisfy the pattern (See Fig 6.1.)
pattern can be any kind of regular expression, e.g. [a-f]*.c
which gives all files starting with a letter between a and f
and ending with .c. default is the default file name.
message is the message string placed at the top of the form.
Now the user can choose a file from the list given. Function
returns a pointer to a static buffer that contains the filename
selected or null if the Cancel button is pressed (see below).
The user can also walk through the directory structure, either by changing the directory string by pressing the mouse on it or by pressing his mouse on a directory name (shown with a D in front of it) to enter this directory. All directory entries read are cached internally (up to 10 directories), and if there is any change in directory entries, click on ReScan button to force an update.
In a typical application, once the file selector goodie is shown, it is up to the user when the file selector should be dismissed by pushing Ready or Cancel button. In some situations, the application may want to remove the file selector. To this end, the following routine is available
void fl_hide_fselector(void)
The effect of removing the file selector programmatically is the same as pushing the Cancel button.
There are total of FL_MAX_FSELECTOR (6) file selectors
in the Forms Library with each having its own current directory and content cache.
All the file selector functions documented manipulate the currently active
file selector, which can be set using the following routine
int fl_use_fselector(int n)
where n is a number between 0 and (FL_MAX_FSELECTOR - 1).
To change the font the file selector uses, the following routine can be used:
   void fl_set_fselector_fontsize(int font_size)
   void fl_set_fselector_fontstyle(int font_style)
These routines change the font for all the objects on the form.
It is possible to change the font for some of the objects
(e.g., browser only) using fl_get_fselector_fdstruct()
explained later.
The window title of the file selector can be changed anytime using the following routine
void fl_set_fselector_title(const char *title)
To force an update programmatically, call
fl_invalidate_fselector_cache(void)
before fl_show_fselector(). Note that this call only
forces an update once, and on the directory that is to be
browsed. To disable caching altogether, the following
routine can be used:
fl_disable_fselector_cache(int yes);
A false parameter (re)enables the directory cache.
The user can also change the pattern by pushing the mouse on it. Note that directories are shown independent of whether they satisfy the pattern. He can also type in a file name directly.
Complete keyboard navigation is built-in. E.g., you can use <ALT> d to change the directory instead of using the mouse.
When the user is satisfied, i.e., found the correct directory and indicated the file name required, he can press the button labeled Ready or press the <RETURN> key. He can also double click on the file name in the browser. The full path to the filename is returned by the procedure. If the user presses the Cancel button NULL is returned.
It is also possible to set a callback routine so that whenever the user double clicks on a filename, instead of returning the filename, the callback routine is invoked with the filename as the argument. To set such a callback, use the following routine
    void fl_set_fselector_callback(void (*callback)(const char *, void *),
                                  void *user_data);
where the second argument of the callback is the user_data. Note that the behavior of the file selector is slightly different when a callback is present. Without the callback, a file selector is always modal.
The placement of the file selector is by default centered on the screen, which can be changed by the following routine
void fl_set_fselector_placement(int place);
where place is the placement request same as in fl_show_form().
The default is FL_PLACE_CENTER|FL_FREE_SIZE.
By default, an fselector is displayed with transient property set. To change the default, use the following routine
void fl_set_fselector_border(int flag)
set border request is the same as in fl_show_form(),
but FL_NOBORDER is ignored.
When the arguments directory, pattern or default are empty, the previous value is used (some good defaults when this happens the first time). Thus the file selector ``remembers" all the settings the selector used last time. The application program can figure out the directory, pattern and file name (without the path) after the user changed them using the routines
   const char *fl_get_directory(void)
   const char *fl_get_pattern(void)
   const char *fl_get_filename(void)
There are other routines that make the fselector more flexible. The most important of which is the ability to accommodate up to three application specific button:
   void fl_add_fselector_appbutton(const char *label,
                                   void (*callback)(void *), void *data)
Again, the argument data is passed to the callback
To remove an application specific button, use the following routine
void fl_remove_fselector_appbutton(const char *label)
Whenever this application specific button is pushed, the callback function is invoked. Within the callback function, in addition to using the routines mentioned above, the following routines can be used:
void fl_refresh_fselector(void)
This function causes the file selector to re-scan the current directory and to list all entries in it. For whatever reason, if there is a need to get the fselector form identifier, the following routine can be used:
FL_FORM *fl_get_fselector_form(void)
See fbrowse.c for the use of the file selector.
Although discouraged, it is recognized that direct access to the individual objects on the fselector form may be necessary. To this end, the following routine exists
   typedef struct
   {
       FL_FORM *fselect;
       FL_OBJECT *browser, *input, *prompt, *resbutt;
       FL_OBJECT *patbutt, *dirbutt, *cancel, *ready;
       FL_OBJECT *dirlabel, *patlabel;
       FL_OBJECT *appbutt[3];
   } FD_FSELECTOR;

   FD_FSELECTOR *fl_get_fselector_fdstruct(void)
You can, for example, change the default label strings of various buttons
via structure members of FD_FSELECTOR:
    FD_FSELECTOR *fs;
    fs = fl_get_fselector_fdstruct();
    fl_set_object_label(fs->ready,"Go !");
    fl_fit_object_label(fs->ready, 1, 1);
Since the fdstruct returned is a pointer to internal structures, the members of fdstruct should not be freed or changed in ways that are not safe, which includes hiding or showing of the forms.
Special files are marked with a distinct prefix in the browser
(for example, D for directory, p for pipe etc). To
change the prefix, use the following routine
   void fl_set_fselector_filetype_marker(int dir, int fifo, int socket,
                                         int cdev, int bdev)
Although file systems under Unix are similar, they are not identical. In the implementation of fselector, the subtle differences in directory structure are isolated and conditionally compiled so an apparent uniform interface to the underlying directory structure is achieved. To facilitate alternative implementations of file selectors, the following (internal) routines can be freely used.
To get a directory listing, the following routine can be used
   const FL_Dirlist *fl_get_dirlist(const char *dirname,
                                   const char *pattern,
                                   int *nfiles, int rescan)
where dirname is the directory name; pattern is a regular expression that is used to filter the directory entries; nfiles on return is the total number of entries in directory dirname that match the pattern (not exactly true, see below.) The function returns the address of an array of nfiles dirlist if successful and null otherwise. By default, directory entries are cached. A true rescan requests a re-read.
The FL_Dirlist is a structure defined as follows
   typedef struct
   {
       char *name;             /* file name              */
       int type;               /* file type              */
       long dl_mtime;          /* file modification time */
       unsigned long dl_size;  /* file size in bytes     */
   }  FL_Dirlist;
where type is one of the following file types
| FT_FILE | a regular file. |
| FT_DIR | a directory. |
| FT_SOCK | a socket. |
| FT_FIFO | a pipe. |
| FT_LINK | a symbolic link. |
| FT_BLK | a block device. |
| FT_CHR | a character device. |
| FT_OTHER | ? |
To free the list cache returned by fl_get_dirlist,
use the following call
void fl_free_dirlist(FL_Dirlist *dl)
Note that a cast may be required to get rid of the const qualifier
See demo program dirlist.c for an example use of
fl_get_dirlist().
By default, not all types of files are returned by fl_get_dirlist().
The specific rules regarding which types of file to return are
controlled by an additional filter after the pattern filter
int ffilter(const char *name, int type)
which is called for each entry (except for directory) that matches the pattern found in the directory. Function should return true if the entry is to be included in the dirlist. The default filter is similar to the following
   int ffilter(const char *name, int type)
   {
       return type == FT_FILE || type == FT_LINK;
   }
To change the default filter, use the following routine
   typedef int (*FL_DIRLIST_FILTER)(const char *, int);
   FL_DIRLIST_FILTER fl_set_dirlist_filter(FL_DIRLIST_FILTER filter)
Since there is only one filter active at anytime in XForms, changing the filter affects file browser.
By default, the files returned are sorted alphabetically. You can change the default sorting using the following routine:
void fl_set_dirlist_sort(int method)
where method can be one of the following
For directories having large number of files, reading the directory can take quite a long time due to sorting and filtering. Electing not to sort and (to a lesser degree) not to filter the directory entries (by setting the filter to null) can speed up the directory reading considerably.