Earlier chapters discussed ways to build user interfaces by combining suitable objects from the Forms Library, defining a few object callbacks and using Xlib functions. However, there is always a possibility that the built-in objects of the Forms Library might not be enough. Although free objects in principle provide all the flexibility a programmer needs, there are situations where it is beneficial to create new types of objects, for example, switches or joysticks or other types of sliders, etc. In this case, a programmer can use the architecture defined by the Forms Library to create the new object class that will work smoothly with the built-in or user-created object classes.
Creating such new object classes and adding them to the library is
simpler than it sounds. In fact it is almost the same as making
free objects. This part gives you all the details of how to add new classes.
In chapter 23 a global architectural overview
is given of how the Forms Library works and how it communicates with the
different object classes by means of events (messages).
Chapter 24 describes in detail what type of events objects can
receive and how they should react to them.
Chapter 25 describes in detail the structure of the type
FL_OBJECT which plays a crucial role, a role equivalent to
a superclass (thus all other object classes have FL_OBJECT
as their parent class) in object-oriented programming.
One of the important aspects of an object is how to draw it on the screen. Chapter 26 gives all the details on drawing objects. The Forms Library contains a large number of routines that help you draw objects. In this chapter an overview is given of all of them. Chapter 27 gives an example illustrating how to create a new object class. Due to the importance of button classes, special routines are provided by the Forms Library to facilitate the creation of this particular class of objects. Chapter 28 illustrates by two examples the procedures of creating new button classes using the special services. One of the examples is taken from the Forms Library itself and the other offers actual usability.
Sometimes it might be desirable to alter the behavior of a built-in class slightly. Obviously a full-blown (re)implementation from scratch of the original object class is not warranted. Chapter 29.1 discusses the possibilities of using the pre-emptive handler of an object to implement derived objects.
The Forms Library defines the basic architecture of an object class. This architecture allows different object classes developed by different programmers to work together without complications.
The Forms Library consists of a main module and a number of object class modules. The object class modules are completely independent from the main module. So new object class modules can be added without any change (nor recompilation) of the main module. The main module takes care of all the global bookkeeping and the handling of events. The object class modules have to take care of all the object specific aspects, like drawing the object, reacting to particular types of user actions, etc. For each class there exists a file that contains the object class module. For example, there are files slider.c, box.c, text.c, button.c, etc.
The main module communicates with the object class modules by means of
events (messages if you prefer). Each object has to have a handle
routine known to the main module so that it can be called whenever
something needs to be done. One of the arguments passed to the handle
routine is the type of event, e.g. FL_DRAW, indicating that the
object needs to be redrawn.
Each object class consists of two components. One component, both its
data and functions, is common to all object classes in the Forms Library.
The other component is specific to the object class in question and
is typically opaque. So for typical object classes, there should be
routines provided by the object class to manipulate the object
class specific data. Since C lacks inheritance as a language
construct, inheritance is implemented in the Forms Library by pointers
and
the global function fl_make_object().![]() It is helpful to understand the global architecture
and the object-oriented approach of the Forms Library, it makes reading
the C code easier and also adds perspective on why
some of the things are implemented the way they are.
It is helpful to understand the global architecture
and the object-oriented approach of the Forms Library, it makes reading
the C code easier and also adds perspective on why
some of the things are implemented the way they are.
In this chapter it is assumed that we want to create a new class with
a name NEW. Creating a new object class mainly consists of writing
the handle routine. There also should be a routine that adds an object
of the new class to a form and associates the handle routine to it.
This routine should have the following basic form:
   FL_OBJECT *fl_add_NEW(int type,FL_Coord x,FL_Coord y,
                         FL_Coord w,FL_Coord h, const char *label)
This routine must add an object of class NEW to the current form. It gets the parameters type, indicating the type of the object within the class (see below), x, y, w, and h, indicating the bounding box of the object in the current active unit (mm, point or pixels), and label which is the label of the object. This is the routine the programmer uses to add an object of class NEW to a form. See below for the precise actions this routine should take.
One of the tasks of fl_add_NEW() is to bind the event handling
routine to the object. For this it will need a routine:
   static int handle_NEW(FL_OBJECT *obj,int event,FL_Coord mx,FL_Coord my,
                         int key, void *xev)
This routine is the same as the handle routine for free objects and should handle particular events for the object. mx, my give the current mouse position and key the key that was pressed (if this information is related to the event). See chapter 24 for the types of events and the actions that should be taken. xev is the XEvent that caused the invocation of the handler. Note that some of the events may have a null xev parameter, so xev should be checked before dereferencing it.
The routine should return whether the status
of the object is changed, i.e., whether the event dispatcher should
invoke this object's callback or if no callback
whether the object is to be returned to the application program
by fl_do_forms() or
fl_check_forms(). What constitutes a status change is
obviously dependent on the specific object class and possibly
its types within this class. For example, a mouse push on a radio button
is considered a status change while it is not for a normal button
where a status change occurs on release.
Moreover, most classes have a number of other routines to change settings of the object or get information about it. In particular the following two routines often exist:
void fl_set_NEW(FL_OBJECT *obj, ...)
that sets particular values for the object and
??? fl_get_NEW(FL_OBJECT *obj, ...)
that returns some particular information about the object. See e.g. the
routines fl_set_button() and fl_get_button().
fl_add_NEW() has to add a new object to the form and bind its handle
routine to it. To make it consistent with other object classes and
also more flexible, there should in fact be two routines:
fl_create_NEW() that creates the object and
fl_add_NEW() that actually adds it to the form. They normally look as
follows:
   typedef struct { /* instance specific record */} SPEC;

   FL_OBJECT *fl_create_NEW(int type,FL_Coord x,FL_Coord y,
                            FL_Coord w,FL_Coord h,const char *label)
   {
       FL_OBJECT *ob;

       /* create a generic object */
       ob = fl_make_object(FL_COLBOX,type,x,y,w,h,label,handle_NEW);

       /* fill in defaults */
       ob->boxtype = FL_UP_BOX;

       /* allocate instance-specific storage and fill it with defaults */
       ob->spec_size = sizeof(SPEC);
       ob->spec = fl_calloc(1, op->spec_size);
       return ob;
   }
The constant FL_NEW will indicate the object class. It should be an
integer. The numbers 0-(FL_USER_CLASS_START-1)(1000)
and FL_BEGIN_GROUP(10000) and higher are reserved for the system
and should not be used. Also it is preferable to use
fl_malloc(), fl_calloc(), fl_realloc() and fl_free()
to allocate/free the memory for the instance specific structures.
These routines have the same prototypes and work the same
as those in the standard library, and may offer additional
debugging capabilities in future versions of Forms Library.
The pointer ob returned by
fl_make_object()
will have all of its fields set to some defaults (See Chapter 25).
In other words, the newly created object inherits many attributes
of a generic one. Any class specific defaults that are different from
the generic one can be changed after fl_make_object().
Conversion of unit, if different
from the default pixel, is performed within fl_make_object()
and a class module never needs to know what the prevailing unit is. After
the object is created, it has to be added to a form:
   FL_OBJECT *fl_add_NEW(int type,FL_Coord x,FL_Coord y,FL_Coord w,
                        FL_Coord h, const char *label)
   {
       FL_OBJECT *ob;
       ob = fl_create_NEW(type,x,y,w,h,label);
       fl_add_object(fl_current_form,ob);
       return ob;
   }
As indicated above, the main module of the Forms Library communicates with the objects by calling the associated handling routine with, as one of the arguments, the particular event for which action must be taken. In the following we assume that obj is the object to which the event is sent. The following types of events can be sent to an object:
FL_ObjWin(ob).
Some other aspects might also influence the way the object has to be
drawn. E.g., you might want to draw the object differently when the mouse is
on top of it or when the
mouse is pressed on it. This can be figured out as follows. The field
obj->belowmouse indicates whether the object is below the
mouse. The field obj->pushed indicates whether the object
is currently being pushed with the mouse. Finally,
obj->focus
indicate whether input focus is directed towards this
object.
Note that the drawing of the object is the full responsibility of the object
class, including the bounding box and the label, which can be found in the
field obj->label.
The Forms Library provides a large number of routines to help you draw object.
See chapter 26 for more details on drawing objects and an
overview of all available routines.
One caution about the draw event handle code is that all the high level
routines (fl_freeze_form(), fl_deactivate_form())
should not be used. The only routines allowed are (direct) drawing and
object internal book keeping routines. Attributes modifying routines, such
as fl_set_object_color() etc. are not allowed (which can lead
to infinite recursion). In addition, (re)drawing of other objects using
fl_redraw_object() while handling FL_DRAW would
not work.
Due to the way the double buffering is handled, FL_ObjWin(ob)
at FL_DRAW time (and only then) is the backbuffer if the object
is double bufferred. What this means is that FL_ObjWin(ob)
should not be used where a real window is expected. The difference between
xforms backbuffer and a real window is that you can change the real window's
cursor or query the mouse position with it. You can not do either of these
with the backbuffer pixmap. If there is a need to obtain the real window
ID, the following routine can be used:
Window fl_get_real_object_window(FL_OBJECT *)
To summarize, use FL_ObjWin(ob) when drawing
and use fl_get_real_object_window() for
cursor or pointer routines. This distinction
is important only while handling FL_DRAW and
FL_ObjWin(ob) should be used anywhere else.
FL_DRAW and indicates
the object label needs to be
(re)drawn.
If the object in question always draws its label inside
the bounding box, and is taken care of by FL_DRAW, you can
ignore this event.
fl_redraw_object(). It will send an FL_DRAW
event to the object but also does some other things (like setting window
id's and taking care of double buffering).
FL_ENTER
and FL_LEAVE events when the mouse position
changes on the object (in fact, it is sent all the time even if the mouse
position remains the same). The mouse position is given as an argument to the
handle routine.
FL_CLICK_TIMEOUT). This event is sent
after two FL_PUSH, FL_RELEASE sequence.
Note that FL_DBLCLICK is only generated for
objects that have non-zero obj->click_timeout fields
and it will not be generated for middle mouse button clicks.
FL_DBLCLICK, FL_PUSH, FL_RELEASE
sequence. Set click_timeout to none zero to activate
FL_TRPLCLICK.
FL_PUSH and an
FL_RELEASE event (i.e., a mouse button is down).
The mouse position is given with the routine and action can be
taken. For example, sliders use this event while buttons do not.
Note that this event is send periodically as long as
the a mouse button is down.
FL_FOCUS
and FL_UNFOCUS events. Not all objects are sent keyboard
events, only those that have non-zero value in field
obj->input or obj->wantkey.
Many of these events might make it necessary that the object has to
be redrawn or partially redrawn. Always do this using the routine
fl_redraw_object().
The Forms Library has a mechanism of dealing with keyboard shortcuts. In this way the user can use the keyboard rather than the mouse for particular actions. Obviously only active objects can have shortcuts. At the moment there are three object classes that use this, namely buttons, inputs and browsers although they behave differently.
The mechanism works as follows. There is a routine
void fl_set_object_shortcut(FL_OBJECT *obj, const char *str, int showit)
with which the object class can bind a series of keys to an object.
E.g., when str is "acE#d^h" the keys a,c,E,
<ALT> d and <CNTRL> h are associated with the
object. The precise format is as follows: Any character in
the string is considered as a shortcut, except for ^ and #,
which stand for combinations with the <CONTROL>,
and <ALT> key. (There is no difference between e.g.
^C and ^c.) The symbol ^ itself can be obtained using
^^. The symbol # can be obtained using ^#. So,
e.g. #^# means <ALT> #. The <ESCAPE> key can be given as
^[.
To indicate function and arrow keys, the &n sequence
(n = 1 ![]() 35) can be used. For example,
35) can be used. For example, &2 indicates
<F2> key. Note that
the four cursors keys (up, down, right, and left) can be
given as <&A>, <&B>, <&C> and
<&D> respectively.
The key & itself can be obtained by prefixing it with
^.
Parameter showit indicates whether
the shortcut letter in the object label should be underlined if a match
exists.
Although the entire object label is searched for matches, only
the first alphanumerical character in the shortcut string is used.
E.g., for object label "foobar", shortcut "oO"
would result in a match at the first o in "foobar"
while "Oo" would not. However, "^O" always matches.
To use other special keys not described above as shortcuts, the following routine must be used
void fl_set_object_shortcutkey(FL_OBJECT *ob, unsigned int key)
where <KEY> is an X KeySym, for example, XK_Home, XK_F1
etc. Note that function fl_set_object_shortcutkey always appends
the key specified to the current shortcuts while
fl_set_object_shortcuts resets the shortcuts. Of course,
special keys can't be underlined.
Now whenever the user presses one of these keys
an FL_SHORTCUT event is sent to the object.
Here the key pressed is given with the handle routine (in the
argument key). Combinations with the <ALT> key are given
by adding FL_ALT_VAL (currently the 25th bit, i.e., 0x1000000) to
the ASCII value of the rest. E.g. #^E is passed as 5+FL_ALT_VAL.
The object can now take action accordingly.
If you use shortcuts to manipulate class object specific
things, you will need to create a routine to communicate with
the user, e.g., fl_set_NEW_shortcut(), and do your own
internal bookkeeping to track what keys do what and then
call fl_set_object_shortcut() to register the shortcut in
the event dispatching module.
The idea is NOT that the user himself calls fl_set_object_shortcut()
but that the class provides a routine for this that also keeps track of the
required internal bookkeeping. Of course, if there is no internal
bookkeeping, a macro to this effect would suffice. For example,
fl_set_button_shortcut is defined as
fl_set_object_shortcut.
The order in which keys are handled is as follows:
First a key is tested whether any object in the form has the key as a
shortcut. If affirmative,
the first of those objects gets the shortcut event. Otherwise,
the key is checked to see if it is <TAB> or <RETURN>.
If it is, the obj->wantkey field is checked. If the field
does not contain FL_KEY_TAB bit,
input is focussed on the next input field. Otherwise
the key is sent to the current input field. This means that input
objects only get a <TAB> or <RETURN> key sent to them
if the field obj->wantkey contain FL_KEY_TAB.
This is e.g. used in multi-line input fields.
If the object wants
all cursor keys (including <PGUP> etc.), the wantkey field
can be set to FL_KEY_SPECIAL.
To summarize, the obj->wantkey can take on the following
values or the bit-wise or of them
FL\_KEY\_NORMAL plus <TAB>, <RETURN> and Up and Down
cursor keys.
It is possible for a non-input object (i.e.,obj->input is zero) to obtain special keyboard event by setting obj->wantkey to FL_KEY_SPECIAL.
Each object has a number of attributes. Some of them are used by the main routine, some have a fixed meaning and should never be altered by the class routines and some are free for the class routines to use. Below we consider some of them that are likely to be used in new classes.
FL_BUTTON,
FL_NEW etc.)
handle_NEW has to take care that this is actually drawn.
Note that there is a routine for this, see below.
FL_RESIZE_NONE, FL_RESIZE_X and
FL_RESIZE_Y. Default is FL_RESIZE_X|FL_RESIZE_Y.
fl_set_object_color(). The routine
fl_add_NEW() should fill in
defaults.
fl_set_object_label().)
The user can change it using the routine fl_set_object_label().
The label must be drawn by the routine handle_NEW when it receives a
FL_DRAW event. (The system does not draw the label automatically
because it does not know where to draw it.)
For non-offsetted labels, i.e., the alignment is relative to
the entire bounding box, simply calling fl_draw_object_label()
should be enough.
fl_set_object_lcol().
fl_set_object_lsize().
fl_set_object_lstyle().
FL_ALIGN_LEFT, FL_ALIGN_RIGHT,
FL_ALIGN_TOP, FL_ALIGN_BOTTOM, FL_ALIGN_CENTER.
FL_ALIGN_TOP_LEFT, FL_ALIGN_TOP_RIGHT,
FL_ALIGN_BOTTOM_LEFT and FL_ALIGN_BOTTOM_RIGHT.
The user can set this using the routine fl_set_object_align().
fl_add_NEW() routine will have to provide storage
for it. For example, for sliders it stores the minimum value,
maximum value and current value of the slider. Most classes
(except the most simple ones like boxes and texts) will need this.
Whenever the object receives the event FL_FREEMEM it should free this
memory.
fl_form_is_visible() is true.
FL_DRAW. Static objects, such as
text and boxes are inactive. Changing the status should be
done in the fl_add_NEW() routine if required.
By default objects are active.
fl_add_NEW() if required.
Note that not all keys are sent (see wantkey below).
FL_KEY_TAB these
keystrokes as well as as four directional cursor keys will also be
sent to the object when focus is directed to it. If however, an object
is only interested in keys that are special (e.g., <HOME>,<PGUP> etc),
this variable can be set to FL_KEY_SPECIAL with or
without input being set.
fl_add_NEW() routine should set it if required.
FL_STEP event all
the time. For example, the object class clock is automatic.
automatic by default is false.
fl_add_NEW() sets this by providing the correct handling routine.
Normally it is never used or changed although there might be situations
in which you want to change the interaction handling routine for
an object, due to some user action.
reference or modify this field in any way. The object classes, including the built-in ones, may use this field.
main module does not reference or modify this field in any way and neither should the class routines.
The generic object construction routine
   FL_OBJECT *fl_make_object(int objclass, int type,
                             FL_Coord x, FL_Coord y, FL_Coord w, FL_Cord h,
                             const char *label, FL_HANDLEPTR handle)
allocates a chunk of memory appropriate for all object classes and initializes the newly allocated object to the following state:
   obj->resize = FL_RESIZE_X|FL_RESIZE_Y;
   obj->nwgravity = obj->segravity = FL_NoGravity;
   obj->boxtype = FL_NO_BOX;
   obj->align = FL_ALIGN_CENTER | FL_ALIGN_INSIDE;
   obj->lcol  = FL_BLACK;
   obj->lsize = FL_DEFAULT_SIZE;   /* SMALL_SIZE, 10pt */
   obj->lstyle = FL_NORMAL_STYLE;
   obj->col1 = FL_COL1;
   obj->col2 = FL_MCOL;
   obj->wantkey == FL_KEY_NORMAL;
   obj->active = 1;
   obj->visible = 1;
   obj->bw = (borderWidth resource set ? resource_val:FL_BOUND_WIDTH);
   obj->spec = 0;
There is rarely any need for the new object class to know
how the object is added to a form and how the Forms Library manages the geometry,
e.g., does an object have its own window etc.
Nonetheless if this information is required,
use FL_ObjWin(ob) to obtain the window resource ID
the object belongs to. Beware
that an object window ID may be shared with other
objects![]() . Always
remove an object from the screen with
. Always
remove an object from the screen with
fl_hide_object().
The class routine/application may reference the following members of the FL_FORM structure to obtain information on the status of the form, but should not modify them directly
fl_show_form() and/or fl_hide_form() to change this member.
An important aspect of a new object class (or a free object) is how to draw
it. As indicated above this should happen when the event FL_DRAW is
received by the object. The place, i.e. bounding box, where the object
has to be drawn is indicated by the fields
obj->x, obj->y, obj->w obj->h.
Forms are drawn in the Forms Library default visual or the user requested
visual, which could be any of the X supported visuals. Hence,
preferably your classes should run well in all visuals.
Forms Library tries to hide as much as possible the information about graphics mode,
and in general, using the built-in drawing routines is the best
approach. Here are some details about graphics state in case
such information is needed.
All state information is kept in a global structure of type
FL_STATE and there is a total of six (6) such
structures fl_state[6], each for every visual class.
The structure contains the following members,
among others
xvinfo.
FL_CANVAS).
You can allocate colors from this colormap, but you should never free
it.
fl_default_window(), is defined to return this member and use
of the macro is encouraged.
gc[0]) is the default GC used by
many internal routines and should be modified with care.
It is a good idea to use only the top 8 GCs (8-15) for your
free object so that future Forms Library extensions won't interfere
with your program. Since many internal drawing routines
use the Forms Library's default GC (gc[0]), it can change anytime
whenever drawing occurs. Therefore, if you
are using this GC for some of your own drawing routines
make sure to always set the proper value before using it.
Currently active visual class TrueColor, PseudoColor etc. can be obtained by the following function/macro:
   int fl_get_form_vclass(FL_FORM *);

   int fl_get_vclass(void);
The value returned can be used as an index into the
fl_state structure. Note fl_get_vclass() should only
be used within a class/new object module where there can be
no confusion what the ``current" form is.
Other information about the graphics mode can be obtained
by using visual class as an index into the fl_state
structure. For example, to print the current visual depth, code
similar to the following can be used:
   int vmode = fl_get_vclass();
   printf("depth: %d\n", fl_state[vmode].depth);
Note that fl_state[] for indices other than the
currently active visual class might not be valid.
In almost all Xlib calls, the connection to
the X server and current window ID are needed. Forms Library maintains some
utility functions/macros to facilitate easy utilization of Xlib
calls. Since the current version of Forms Library only maintains a
single connection, the global variable Display *fl_display
can be used where required. However, it is recommended that
you use fl_get_display() or FL_FormDisplay(form)
instead since the function/macro version has the advantage that
your program will remain compatible with future (possibly
multi-connection) versions of the Forms Library.
There are a couple of ways to find out the ``current" window ID,
defined as the window ID the object receiving dispatcher's messages
FL_DRAW etc. belongs to. If the object ID is available,
FL_ObjWin(obj) would suffice and otherwise,
fl_winget() can be used.
There are other routines that might be useful:
FL_FORM *fl_win_to_form(Window win)
This function takes a window ID win and returns the form the window belongs to either as an equivalent form->window == win or as a child to form->window.
As mentioned earlier, Forms Library keeps an internal colormap initialized to predefined colors. The predefined color symbols do not correspond to pixel values the server understands. Therefore, they should never be used in any of the GC altering or Xlib routines. To get the actual pixel value the server understands, use the following routine
FL_COLOR fl_get_pixel(FL_COLOR index)
e.g., to get the pixel value of red color, use
    FL_COLOR red_pixel;
    red_pixel = fl_get_pixel(FL_RED);
fl_color(FL_RED);
This sets the foreground color in the default GC (gc[0]) to
red_pixel.
To set the background color in the Forms Library's default GC, use the follow routine
fl_bk_color(FL_COLOR index)
To set foreground or background in GCs other than the Forms Library's default, the following functions exist:
   void fl_set_foreground(GC gc, FL_COLOR index)
   void fl_set_background(GC gc, FL_COLOR index)
which is equivalent to the following Xlib calls
    XSetForeground(fl_display, gc, fl_get_pixel(index))
    XSetBackground(fl_display, gc, fl_get_pixel(index))
To free allocated colors from the default colormap, use the following routine
void fl_free_colors(FL_COLOR *cols, int n);
This function frees the colors represented by the cols array.
In case the pixel values, as opposed to Forms Library's values, are known, the following routine can be used to free the colors from the default colormap
void fl_free_pixels(unsigned long *pixels, int n);
Note that the internal colormap maintained by the Forms Library is not updated. This is in general harmless.
To modify or query the internal colormap, use the following routines,
   long fl_mapcolor(FL_COLOR ind, int red, int green, int blue)
   long fl_mapcolorname(FL_COLOR ind, const char *name)

   void fl_getmcolor(FL_COLOR ind, int *red, int *green, int *blue)
The coordinate system of the form by default corresponds directly to the screen. Hence a pixel on the screen always has size 1 in the default coordinate system of the form. Object coordinates are relative to the upper-right corner of the form.
To obtain the position of the mouse in the current form/window, use the routine
   Window fl_get_form_mouse(FL_FORM *form, FL_Coord *x, FL_Coord *y,
                            unsigned *keymask)

   Window fl_get_win_mouse(Window win, FL_Coord *x, FL_Coord *y,
                           unsigned *keymask)
The functions return the window ID the mouse is in. Upon its return,
x,y would be set to the the mouse position relative to the form/window,
and keymask contains information on modifier keys (same as
the the corresponding XQueryPointer()
argument).
Similar routine exists that can be used to obtain the mouse location relative to the root window
Window fl_get_mouse(FL_Coord *x, FL_Coord *y, unsigned *keymask);
The function returns the window ID the mouse is in.
To move the mouse to a specific location relative to the root window, use the following routine
void fl_set_mouse(FL_Coord x, FL_Coord y)
To avoid drawing outside a bounding box the following routine exists.
void fl_set_clipping(FL_Coord x,FL_Coord y,FL_Coord w,FL_Coord h)
It sets a clipping region in the Forms Library's default GC. x, y, w and h are as in the definition of objects. Drawing is restricted to this region after the call. In this way you can prevent drawings from sticking into other objects. Always use after drawing
void fl_unset_clipping(void)
to stop clipping.
To obtain the bounding box of an object with the dimension
and location of the label taken into account (compare
with fl_get_object_geometry()
the following routine exists:
   void fl_get_object_bbox(FL_OBJECT *ob, FL_Coord *x, FL_Coord *y,
                           FL_Coord *w, FL_Coord *h)
To set clippings for text, which uses a different GC, the following routine should be used
   void fl_set_text_clipping(FL_Coord x,FL_Coord y,FL_Coord w,FL_Coord h)

   void fl_unset_text_clipping(void)
For drawing text at the correct places you will need some information about the sizes of characters and strings. The following routines are provided:
int fl_get_char_height(int style, int size, int *ascend, int *descend)
int fl_get_char_width(int style, int size)
These two routines return the maximum height and width of the font used, where size indicates the point size for the font and style is the style in which the text is to be drawn. A list of valid styles can be found in Section 3.11.3. To obtain the width and height information on a specific string, use the following routines
   int fl_get_string_width(int style, int size, const char *str, int len)

   int fl_get_string_height(int style, int size, const char *str, int len,
                            int *ascend, int *descend)
where len is the string length. The functions return the width and height of the string str respectively.
There exists also a routine that returns the width and height of a string in one call. In addition, the string passed can contain embedded newline in it and the routine will make proper adjustment so the values returned are (just) large enough to contain the multiple lines of text
   void fl_get_string_dimension(int style, int size, const char *str,
                                int len, int *width, int *height)
Sometimes, it may be useful to get the X font structure for a particular size and style as used in XForms. For this purpose, the following routine exists :
[const] XFontStruct *fl_get_fontstruct(int style, int size)
The structure returned can be used in, say, setting the font in a particular GC
   XFontStruct *xfs = fl_get_fontstruct(FL_TIMESBOLD_STYLE, FL_HUGE_SIZE);
   XSetFont(fl_get_display(), mygc, xfs->fid);
Caller should not free the structure returned by fl_get_fontstruct().
There are a number of routines that help you draw objects on the screen. All XForms's internal drawing routine draws into the ``current window", defined as the window the object that uses the drawing routine belongs to. Nevertheless, the following routines can be used to set or query the current window
   void fl_winset(Window win)

   Window fl_winget(void)
One caveat about fl_winget() is that it can return
0 if called outside of object's event handler depending on
where the mouse is. Thus, the return value of this function
should be checked when called outside of an object handler.
It is important to remember that unless the following drawing
commands are issued while handling the FL_DRAW event
(not generally recommended), it is the application's responsibility to
set the proper drawable using fl_winset().
The most basic drawing routine is the rectangle routines:
   void fl_rectf(FL_Coord x,FL_Coord y,FL_Coord w,FL_Coord h,FL_COLOR c)
   void fl_rect(FL_Coord x,FL_Coord y,FL_Coord w,FL_Coord h,FL_COLOR c)
Both draw a rectangle on the screen in color col. The difference
is that fl_rectf() draws a filled rectangle while
fl_rect() draws an outline.
To draw a filled rectangle with a black border, use the following routine
void fl_rectbound(FL_Coord x,FL_Coord y,FL_Coord w,FL_Coord h,FL_COLOR c)
To draw a rectangle with rounded corners, the following routines exist
   void fl_roundrectf(FL_Coord x, FL_Coord y, FL_Coord w, FL_Coord h,
                      FL_COLOR col)

   void fl_roundrect(FL_Coord x, FL_Coord y, FL_Coord w, FL_Coord h,
                     FL_COLOR col)
To draw a general polygon, use one of the following routines
  typedef struct {short x,y;} FL_POINT

  void fl_polyf(FL_POINT *xpoint, int n, FL_COLOR col);

  void fl_polyl(FL_POINT *xpoint, int n, FL_COLOR col);

  void fl_polybound(FL_POINT *xpoint, int n, FL_COLOR col);
fl_polyf() draws a filled polygon; fl_polyl() draws
a polyline; and fl_polybound() draws a filled polygon
with a black outline. Note all polygon routines require that
xpoint have spaces to hold n+1 points.
To draw an ellipse, either filled or open, the following routines
can be used (use w == h to get
a circle)
   void fl_ovalf(FL_Coord x,FL_Coord y,FL_Coord w,FL_Coord h,FL_COLOR c)

   void fl_ovall(FL_Coord x,FL_Coord y,FL_Coord w,FL_Coord h,FL_COLOR c)

   void fl_ovalbound(FL_Coord x, FL_Coord y, FL_Coord w, FL_Coord h,
                      FL_COLOR c)
To draw circular arcs, either open or filled, the following routines can be used
   void fl_arc(FL_Coord x, FL_Coord y, FL_Coord radius,
               int start_theta, int end_theta, FL_COLOR col)

   void fl_arcf(FL_Coord x, FL_Coord y, FL_Coord radius,
               int thetai, int thetaf, FL_COLOR col)
where thetai and thetaf are the starting and ending
angles of the arc, in unit of one tenth of a degree (1/10 degree);
and x,y are the center of the arc. If ![]() is larger than 3600 (360 degrees), it is truncated to 360 degrees.
is larger than 3600 (360 degrees), it is truncated to 360 degrees.
To draw elliptical arcs, the following routine should be used
   void fl_pieslice(int fill, FL_Coord x, FL_Coord y, FL_Coord w,
                    FL_Coord h, int theta1, int thetaf, FL_COLOR col)
The center of the arc is the center of the bounding box specified by (x, y, w, h) and w and h specify the major and minor axes respectively. theta1 and theta2, measured in one tenth of a degree, specify the starting and ending angles measured from zero degrees (3 o'clock).
Depending on circumstance, elliptical arc may be more easily drawn using the following routine
   void fl_ovalarc(int fill, FL_Coord x, FL_Coord y, FL_Coord w,
                    FL_Coord h, int theta, int dtheta, FL_COLOR col)
Here theta specifies the starting angle, again, measured in one tenth of a degree, relative to 3 o'clock position and dtheta specifies both the direction and extent of the arc. If dtheta is positive, it indicates counter-clockwise motion otherwise clockwise. The magnitude of dtheta is greater than 3600, it is truncated to 3600.
To connect two points with a straight line, use the following routine
   void fl_line(FL_Coord x1, FL_Coord y1,
                FL_Coord x2, FL_Coord y2, FL_COLOR col)
There is also a routine to draw a line along the diagonal of a box (to draw a horizontal line use h = 1 not 0.)
   void fl_diagline(FL_Coord x, FL_Coord y, FL_Coord w, FL_Coord h,
                    FL_COLOR col)
To draw multiple connected line segments, use the following routine
   typedef struct {short x, y} FL_POINT;

   void fl_lines(FL_POINT *points, int npoint, FL_COLOR col)
All coordinates in points are relative to the origin of the drawable.
There are also routines to draw pixel or pixels
   void fl_point(FL_Coord x, FL_Coord y, FL_COLOR col)

   void fl_points(FL_POINT *p, int np, FL_COLOR col)
Where all coordinates are relative to the origin of the drawable. Note that these routines are meant for you to draw a few pixels, not images consisting of tens of thousands of pixels of varying
colors, for that XPutImage() (See XPutImage(3X11))
should be used. Also whenever possible when drawing
multiple points, use fl_points() even if that
means the application program has to pre-sort and group
the like colored pixels first.
To change line width or style, the following convenience functions are available
   void fl_linewidth(int lw)
   void fl_linestyle(int style)
Use lw=0 to reset line width to the server default. Line styles can take on the following values (see XChangeGC(3X11))
fl_dashedlinestyle(). Only
the odd numbered segments are drawn with the foreground
color.
FL_LINE_USERDASH, but both even and odd
numbered segments are drawn with the even numbered
segments drawn in background color (fl_bk_color()).
The following routine can be used to change the dash patterns of FL_LINE_USERDASH drawing request:
void fl_dashedlinestyle(const char *dash, int ndashes)
The meanings of the parameters are as follows: Each element of dash is the length of a segment of the pattern in pixels. Dashed lines are drawn as alternating segments, each of an element in dash. Thus the overall length of the dash pattern, in pixels, is the sum of all elements in dash. When the pattern is used up, it repeats. For example, the following code specifies
a long dash (9 pixels), a skip (3 pixels), a short dash (2 pixels) and again a skip (3 pixels). After this sequence, the pattern repeats.
   char ldash_sdash[] = { 9, 3, 2, 3}

   fl_dashedlinestyle(ldash_sdash, 4);
It is important to note that whenever FL_LINE_USERDASH
is used, fldashedlinestyle()+ should be called to
set the dash pattern, otherwise whatever the last non-solid
pattern is will be used. To use the default dash pattern,
you can pass null as the dash parameter to
fl_dashedlinestyle().
By default, all lines are drawn so they overwrite the destination pixel values. It is possible to change the drawing mode so the destination pixel values play a role in the final pixel value
void fl_drawmode(int mode)
where the supported modes are
xor dest.
and dest.
or dest.
~dest.
To obtain the current settings of the line drawing attributes, use the following routines
   int fl_get_linewidth(void)

   int fl_get_linestyle(void)

   int fl_get_drawmode(void)
There are also a number of high-level drawing routines available. To draw boxes the following routine exists. Almost any object class will use it to draw the bounding box of the object.
   void fl_drw_box(int style, FL_Coord x,FL_Coord y,FL_Coord w,FL_Coord h,
                   FL_COLOR col, int bw)
Draws a box. style is the type of the box, e.g FL_DOWN_BOX.
x, y, w, and h, indicate the size of the box.
c is the color.
bw is the width of the boundary, which typically should be
given a value obj->bw or FL_BOUND_WIDTH.
Note that a negative border width indicates a ``softer'' up box.
See DEMOS/borderwidth.c for the visual effect of different border
widths.
There is another routine that draws a frame
   void fl_drw_frame(int style, FL_Coord x, FL_Coord y,
                    FL_Coord w, FL_Coord h, FL_COLOR col, int bw)
All parameters have the usual meaning except that the frame is drawn outside of the bounding box specified.
To draw a slider of various types and shapes, use the following routine
   void fl_drw_slider(int boxtype, FL_Coord x, FL_Coord y,
                      FL_Coord w, FL_Coord h,
                      FL_COLOR col1, FL_COLOR col2,
                      int slider_type,
                      double slider_size, double slider_value,
                      char *label, int parts, int inverted,
                      FL_Coord bw);
where slider_type is FL_VERT_SLIDER etc. See
Section 17.1 for a complete list.
Other parameters have the obvious meaning except for.
parts, which can be one of the following
For drawing text there are two routines:
   void fl_drw_text(int align, FL_Coord x, FL_Coord y, FL_Coord w,
                   FL_Coord h, FL_COLOR c, int style, int size, char *str)

   void fl_drw_text_beside(int align, FL_Coord x, FL_Coord y,
                          FL_Coord w, FL_Coord h, FL_COLOR c,
                          int style, int size, char *str)
where align is the alignment, namely, FL_ALIGN_LEFT,
FL_ALIGN_CENTER etc. x, y, w and h
indicate the bounding box, c is the color of the text,
size is its size (in points), style is the style to be
used (see Section 3.11.3 for valid styles), str
is the string itself, possibly with embedded newlines it in.
fl_drw_text() draws the text inside the bounding box according
to the alignment request while fl_drw_text_beside() draws the
text aligned outside the box. These two routines interpret a text string
starting with the character @ differently and draw some symbols
instead.
Note that fl_drw_text() shrinks the bounding box by 5 pixels
on all sides before computing the alignment position.
The following routine can also be used to draw text and in addition, a cursor can optionally be drawn
   void fl_drw_text_cursor(int align, FL_Coord x, FL_Coord y,
            FL_Coord w, FL_Coord h, FL_COLOR c, int style, int size,
            char *str, int FL_COLOR ccol, int pos)
where ccol is the color of the cursor and pos is the
position of the cursor (-1 means show no cursor). This routine
does not interpret the meta-character @ nor does it
shrink the bounding box in calculating the alignment position.
Given a bounding box and the size of an object (label or otherwise) to draw, the following routine can be used to obtain the starting position
   void fl_get_align_xy(int align, int x, int y, int w, int h,
                        int obj_xsize, int obj_ysize,
                        int xmargin, int ymargin, int *xpos, int *ypos)
This routine works regardless if the object is to be drawn inside or outside of the bounding box specified by x,y,w and h.
For drawing object labels, the following routines might be more convenient
   void fl_draw_object_label(FL_OBJECT *ob)

   void fl_draw_object_label_outside(FL_OBJECT *ob)
These two routines assume that the alignment is relative to the full bounding box. The first routine draws the label according to the alignment, which could be inside or outside of the bounding box. The second routine will always draw the label outside of the bounding box.
An important of aspect of (re)drawing of an object is efficiency which can translate into flicker and non-responsiveness if not handled with care. For simple object like buttons or objects that do not have ``movable parts", drawing efficiency is not a serious issue although you can never be too fast. For complex objects, especially those that a user can interactively change, special care should be taken.
The most important rule for efficient redrawing is don't draw it if you don't absolutely have to, regardless how simple the drawing is. Given the networking nature of X, simple or not depends not only on the host/server speed but also the connection. What this strategy entails is that the drawing should be broken into blocks and depending on the context, draw/updates only those parts that need to be updated.
Let us work through an example of how to create a simple object class colorbox. Assume we want a class with the following behavior: It should normally be red. When the user presses the mouse on it it should turn blue. When the user releases the mouse button the object should turn red again and be returned to the application program. Further, the class module should keep a total count how many times the box is pushed.
The first thing to do is to define some constants in a file colbox.h.
This file should at least contain the class number and one or more types:
   /* FL_USER_CLASS_START <= Class number <= FL_USER_CLASS_END */
   #define FL_COLBOX        (FL_USER_CLASS_START+1)
   #define FL_NORMAL_COLBOX 0     /* The only type */
Note that the type must start from zero onward.
Normally it should also contain some defaults for the boxtype and label alignment etc. The include file also has to declare all the functions available for this object class. I.e., it should contain:
   extern FL_OBJECT *fl_create_colbox(int, FL_Coord, FL_Coord, FL_Coord,
                                      FL_Coord, const char *);
   extern FL_OBJECT *fl_add_colbox(int, FL_Coord, FL_Coord, FL_Coord,
                                   FL_Coord, const char *);
   extern int fl_get_colorbox(FL_OBJECT *);
Secondly we have to write a module colbox.c that contains the
different routines. First of all we need routines to create an object
of the new type and to add it to the current form. We also
need to have a counter that keeps track of number of times
the colbox is pushed. They would look as follows:
   typedef struct { int counter; } SPEC;   /* no. of times pushed */

   FL_OBJECT *fl_create_colbox(int type, FL_Coord x, FL_Coord y,
                               FL_Coord w, FL_Coord h, const char *label)
   {
       FL_OBJECT *ob;

       /* create a generic object class with an appropriate ID */
       ob = fl_make_object(FL_COLBOX,type,x,y,w,h,label,handle_colbox);

       /* initialize some members */
       ob->col1 = FL_RED;
       ob->col2 = FL_BLUE;

       /* create class specific structures and initialize */
       ob->spec = fl_calloc(1, sizeof(SPEC))
       return ob;
   }

   FL_OBJECT *fl_add_colbox(int type, FL_Coord x, FL_Coord y,
                           FL_Coord w,  FL_Coord h, const char *label)
   {
      FL_OBJECT *ob = fl_create_colbox(type,x,y,w,h,label);
      fl_add_object(fl_current_form,ob);
      return ob;
   }
The fields col1 and col2 are used to store the two colors red
and blue such that the user can change them when required with the routine
fl_set_object_color(). What remains is to write the handling routine
handle_colbox(). It has to react to three types of events:
FL_DRAW, FL_PUSH and FL_RELEASE. Also when
the box is pushed, the counter should be incremented to keep a total count.
Note that whether or not the mouse is pushed on the object is indicated
in the field ob->pushed. Hence, when pushing and releasing the
mouse the only thing that needs to be done is redrawing the object.
This leads to the following piece of code:
   static int
   handle_colbox(FL_OBJECT *ob, int event, FL_Coord mx, FL_Coord my,
                int key, void *xev)
   {
     switch (event) {
      case FL_DRAW:
        /* Draw box */
        if (ob->pushed)
           fl_drw_box(ob->boxtype,ob->x,ob->y,ob->w,ob->h,ob->col2,ob->bw);
        else
           fl_drw_box(ob->boxtype,ob->x,ob->y,ob->w,ob->h,ob->col1,ob->bw);
        /* fall through */
      case FL_DRAWLABEL:
        /* Draw label */
        fl_draw_object_label(ob);
        return 0;
     case FL_PUSH:
        ((SPEC *)ob->spec)->counter++;
        fl_redraw_object(ob);
        return 0;
     case FL_RELEASE:
        fl_redraw_object(ob);
        return 1;
     case FL_FREEMEM:
        fl_free(ob->spec);
        return 0;
     }
     return 0;
   }
That is the whole piece of code. Of course, since structure SPEC
is invisible outside colbox.c, the following routine should
be provided to return the total number of times the colbox
is pushed:
   int fl_get_colbox(FL_OBJECT *ob)
   {
       if(!ob || ob->objclass != FL_COLBOX)
       {
          fprintf(stderr, "get_colbox: Bad argument or wrong type);
          return 0;
       }
       return ((SPEC *)ob->spec)->counter;
   }
To use it, compile it into a file colbox.o. An application program
that wants to use the new object class simply should include colbox.h
and link colbox.o when compiling the program. It can then use the
routine fl_add_colbox() to add objects of the new type to a form.
Since button-like object is one of the most important, if not the
most important, classes in graphical user interfaces, Forms Library
provides, in addition to the ones explained earlier,
a few more routines that make create new buttons or button-like objects
even easier. These routines take care of the communication between the main
module and the button handler so all new button classes created
using this scheme behave consistently. Within this scheme,
the programmer only has to write a drawing function
that draws the button. There is no need to handle events or messages
from the main module and all types of buttons, radio, pushed
or normal are completely taken care of by the generic button class.
Further, fl_get_button() and fl_set_button()
work automatically without adding any code for them.
Forms Library provides two routines to facilitate the creation of
new button object classes. One of the routines,
fl_create_generic_button(),
can be used
to create a generic button that has all the properties
of a real button except that this generic button does not
know what the real button looks like. The other routine,
fl_add_button_class(), provide by the Forms Library can be used
to register a drawing routine that completes the creation of
a new button.
All button or button-like object has the following instance-specific structure, defined in forms.h, that can be used to obtain information about the current status of the button:
   typedef struct
   {
       Pixmap pixmap;           /* for bitmap/pixmap button only        */
       Pixmap mask;             /* for bitmap/pixmap button only        */
       unsigned bits_w, bits_h; /* for bitmap/pixmap button only        */
       int val;                 /* whether pushed                       */
       int mousebut;            /* mouse button that caused the push    */
       int timdel;              /* time since last touch (TOUCH buttons)*/
       int event;               /* what event triggered the redraw      */
       long cspecl;             /* for non-generic class specific data  */
       void *cspec;             /* for non-generic class specific data  */
       char *file;              /* filename for the pixmap/bitmap file  */
   }
   FL_BUTTON_STRUCT;
Of all members, only val and mousebut probably will be consulted by the drawing function. cspecl and cspecv are useful for keeping track of class status other than those supported by the generic button (e.g., you might want to add a third color to a button for whatever purposes.) These two members are neither referenced nor changed by the generic button class.
Making this structure visible somewhat breaks the Forms Library's convention of hiding the instance specific data but the convenience and consistency gained by this far outweigh the compromise on data hiding.
The basic procedures in creating a new button-like object are
as follows. First, just like creating any other object classes,
you have to decide on a class ID, an integer between
FL_USER_CLASS_START (1001) and FL_USER_CLASS_END
(9999) inclusive. Then write a header file so that application programs can
use this new class. The header file should include the class ID
definition and function prototypes specific to this new class.
After the header file is created, you will have to write C functions that create and draw the button. Also you need an interface routine to place the newly created button onto a form.
After creating the generic button, the new button class should be made known to the button driver via the following function
    void fl_add_button_class(int objclass,
                             void (*draw)(FL_OBJECT *ob),
                             void (*cleanup)(FL_BUTTON_SPEC *));
where objclass is the class ID, and draw is
a function that will be called to draw the button and cleanup
is a function that will be called prior to destroying the button.
You need a clean-up function only if the drawing routine
uses cspecv field of FL_BUTTON_SPEC to
hold dynamic memory allocated by the new button.
We use two examples to show how new buttons are created.
The first example is taken from the button class in
the Forms Library, that is, real working source code that implements
the button class. To illustrate the entire process of creating
this class, let us call this button class FL_NBUTTON.
First we create a header file to be included in an application program that uses this button class:
   #ifndef NBUTTON_H
   #define NBUTTON_H

   #define FL_NBUTTON     FL_USER_CLASS_START

   extern FL_OBJECT *fl_create_nbutton(int, FL_Coord, FL_Coord,
                                    FL_Coord, FL_Coord, const char *);
   extern FL_OBJECT *fl_add_nbutton(int, FL_Coord, FL_Coord,
                                    FL_Coord, FL_Coord, const char *);
   #endif
Now the drawing function. We use obj->col1 for the normal color of the box; obj->col2 for the color of the box when pushed. We also add an extra property that when mouse moves over the button box, the box changes color. The following is the full source code that implements this:
   typedef FL_BUTTON_STRUCT SPEC;

   static void draw_nbutton(FL_OBJECT * ob)
   {
       long col;

       /* box color. If pushed we use ob->col2, otherwise use ob->col1 */
       col = ((SPEC *) (ob->spec))->val ? ob->col2 : ob->col1;

       /* if mouse is on top of the button, we change the color of
        * the button to a different color. However we only do this if the
        * box has the default color.
        */
       if (ob->belowmouse && col == FL_COL1)
           col = FL_MCOL;

       /* If original button is an up_box and it is being pushed,
        * we draw a down_box. Otherwise, don't have to change
        * the boxtype
        */
       if (ob->boxtype == FL_UP_BOX && ((SPEC *) (ob->spec))->val)
          fl_drw_box(FL_DOWN_BOX, ob->x, ob->y, ob->w, ob->h, col, ob->bw);
       else
          fl_drw_box(ob->boxtype, ob->x, ob->y, ob->w, ob->h, col, ob->bw);

       /* draw the button label */
       fl_drw_object_label(ob);

       /* if the button is a return button, draw the return symbol.
        * Note that size and style are 0 as they are not used when
        * drawing symbols
        */
       if (ob->type == FL_RETURN_BUTTON)
          fl_drw_text(FL_ALIGN_CENTER, (ob->x + ob->w - 0.8 * ob->h - 1),
                     (ob->y + 0.2 * ob->h), (0.6 * ob->h),
                     (0.6 * ob->h),ob->lcol,0,0,"@returnarrow");
   }
Note that when drawing symbols, the style and size are irrelevent
and set to zero in fl_drw_text() above.
Since we don't use cspecv field, we don't have to write a clean-up function.
Next, following the standard procedures of the Forms Library, we code a separate
routine that creates the new button![]()
   FL_OBJECT *fl_create_nbutton(int type, FL_Coord x, FL_Coord y,
                              FL_Coord w, FL_Coord h, const char *label)
   {
       FL_OBJECT *ob;
       ob = fl_create_generic_button(FL_NBUTTON, type, x, y,w,h, label);
       fl_add_button_class(FL_NBUTTON, draw_nbutton, 0);
       ob->col1 = FL_COL1;          /* normal color           */
       ob->col2 = FL_MCOL;          /* pushed color           */
       ob->align = FL_ALIGN_CENTER; /* button label placement */
   }
You will also need a routine that adds the newly created button to a form
   FL_OBJECT *fl_add_nbutton(int type, FL_Coord x, FL_Coord y,
                             FL_Coord w, FL_Coord h, const char *label)
   {
       FL_OBJECT *ob = fl_create_nbutton(type,x,y,w,h,label);
       fl_add_object(fl_current_form, ob);
       return ob;
   }
This concludes the creation of button class FL_NBUTTON.
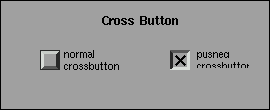
The next example implements a button that might be added to the Forms Library in the future. We call this button crossbutton. Normally this button shows a small up box with a label on the right. When pushed, the up box becomes a down box and a small cross appears on top of it. This kind of button obviously is best used as a push button or a radio button. However, the Forms Library does not enforce this. It can be enforced, however, by the application program or by object class developers.
We choose to use the ob->col1 as the color of the box
and ob->col2 as the color of the cross (remember
these two colors are changeable by the application program
via fl_set_object_color()). Note this decision on color use
is somewhat arbitrary, we can easily make
ob->col2 to be the color of the button when pushed and use
ob->spec->cspecl for the cross color
(another routine
fl_set_crossbutton_crosscol(FL_OBJECT *, FL_COLOR) should be
provided to change the cross color in this case).
We start by defining the class ID and declaring the utility routine prototypes in the header file (crossbut.h):
   #ifndef CROSSBUTTON_H
   #define CROSSBUTTON_H

   #define FL_CROSSBUTTON      (FL_USER_CLASS_START+2)

   extern FL_OBJECT *fl_add_crossbutton(int, FL_Coord, FL_Coord,
                            FL_Coord, FL_Coord, const char *);

   extern FL_OBJECT *fl_create_crossbutton(int, FL_Coord, FL_Coord,
                                       FL_Coord, FL_Coord, const char *);
Next we write the actual code that implements crossbutton class crossbut.c:
   /*
    * routines implementing the "crossbutton" class
    */
   #include "forms.h"
   #include "crossbut.h"

   typedef FL_BUTTON_STRUCT SPEC;

   /** How to draw it */
   static void draw_crossbutton(FL_OBJECT *ob)
   {
       FL_Coord xx, yy, ww, hh;
       SPEC *sp = ob->spec;

       /* there is no visual change when mouse enters/leaves the box */
       if(sp->event == FL_ENTER || sp->event == FL_LEAVE)
           return;

       /* draw the bounding box first */
       fl_drw_box(ob->boxtype, ob->x, ob->y, ob->w, ob->h, ob->col1, ob->bw);

       /* draw the box that contains the cross */
       ww = hh = (0.5 * FL_min(ob->w, ob->h))  -1;
       xx = ob->x + FL_abs(ob->bw);
       yy = ob->y + (ob->h - hh)/2;

       /* if pushed, draw a down box with the cross */
       if(((SPEC *)ob->spec)->val)
       {
         fl_drw_box(FL_DOWN_BOX,xx,yy,ww,hh,ob->col1,ob->bw);
         fl_drw_text(FL_ALIGN_CENTER, xx-2, yy-2, ww+4, hh+4, ob->col2,
                     0, 0, "@9plus");
       }
       else
         fl_drw_box(FL_UP_BOX,xx,yy,ww,hh,ob->col1, ob->bw);

       /* label */
       if (ob->align == FL_ALIGN_CENTER)
           fl_drw_text(FL_ALIGN_LEFT, xx + ww + 2, ob->y, 0, ob->h,
                       ob->lcol, ob->lstyle, ob->lsize, ob->label);
       else
           fl_draw_object_label_outside(ob);

       if (ob->type == FL_RETURN_BUTTON)
          fl_drw_text(FL_ALIGN_CENTER,
                   (FL_Coord)(ob->x + ob->w - 0.8 * ob->h),
                   (FL_Coord)(ob->y + 0.2 * ob->h),
                   (FL_Coord)(0.6 * ob->h),
                   (FL_Coord)(0.6 * ob->h),ob->lcol,0,0,"@returnarrow");
   }
This button class is somewhat different from the normal button
class (FL_BUTTON) in that we enforce the appearance of a
crossbutton so that an un-pushed crossbutton always has an upbox and
a pushed one always has a downbox. Note that
the box that contains the cross is not the bounding
box of a crossbutton although it can be if the drawing function
is coded so.
Rest of the code simply takes care of interfaces:
   /* creation routine */
   FL_OBJECT *
   fl_create_crossbutton(int type, FL_Coord x, FL_Coord y, FL_Coord w,
                         FL_Coord h, const char *label)
   {
        FL_OBJECT *ob;
        fl_add_button_class(FL_CROSSBUTTON, draw_crossbutton, 0);

        /* if you want to make cross button only available for
         * push or radio buttons, do it here as follows:
           if(type != FL_PUSH_BUTTON && type != FL_RADIO_BUTTON)
              type = FL_PUSH_BUTTON;
         */
        ob = fl_create_generic_button(FL_CROSSBUTTON,type,x,y,w,h,label);
        ob->boxtype = FL_NO_BOX;
        ob->col2 = FL_BLACK;   /* cross color */
        return ob;
   }


   /* interface routine to add a crossbutton to a form */
   FL_OBJECT *
   fl_add_crossbutton(int type, FL_Coord x, FL_Coord y, FL_Coord w,
                      FL_Coord h, const char *label)
   {
       FL_OBJECT *ob = fl_create_crossbutton(type, x, y, w, h, label);
       fl_add_object(fl_current_form, ob);
       return ob;
   }
The actual code is in DEMOS/crossbut.c and DEMOS/crossbut.h.
An application program only needs to #include the header file
crossbut.h and link with crossbut.o to use this
new object class. There is no need to change or
re-compile the Forms Library. Of course, if you really like the new object
class, you can modify the system header file forms.h to
include your new class header file automatically (either through
inclusion at compile time or include the actual header). You can
also place the object file (crossbut.o) in libforms.a
if you wish. Note however, library so created may not be
distributed.
Since the current version of Form Designer does not support any new object classes developed as outlined above, the best approach is to use another object class as stubs when creating a form, for example, you might want to use checkbutton as stubs for crossbutton. Once the position and size are satisfactory, generate the C-code and then manually change checkbutton to crossbutton. You probably can automate this with some scripts.
Finally there is a demo program utilizing this new button class. The program is in newbutton.c.
Pre-emptive handlers come into being due to reasons not related to developing new classes. They are provided for the application programs to have access to the current state or event of a particular object. However, with some care, this preemptive handler can be used to override parts of the original built-in handler thus yielding a new class of objects.
As mentioned earlier, an object module communicates with the main module via events and the agent is the event handler, which determines how an object responds to various events such as a mouse click or a key press. A pre-emptive handler is a handler which, if installed, gets called first by the main module when an event for the object occurs. The pre-emptive handler has the option to override the built-in handler by informing the main module not to call the built-in handler, thus altering the behavior of the built-in objects. The post handler, on the other hand, is called when the object handler has finished its tasks and thus does not offer the capability of overriding the built-in handler. It is much safer, however.
The API to install a pre- or post-handler for an object is as follows
    typedef int (*FL_HANDLEPTR)(FL_OBJECT *ob, int event,
                                FL_Coord mx, FL_Coord my,
                                int key, void *raw_event);

    void fl_set_object_prehandler(FL_OBJECT *ob, FL_HANDLEPTR phandler);
    void fl_set_object_posthandler(FL_OBJECT *ob, FL_HANDLEPTR phandler);
Where event is the generic event in the Forms Library, that is,
FL_DRAW, FL_ENTER etc. Parameter mx, my
are the mouse position and key is the key pressed. The last
parameter raw_event is the (cast) XEvent that caused
the invocation of the pre- or post-handler. Again, not all
FL event has corresponding xev and any dereferencing
of xev should only be done after making sure it is not null.
Notice that the pre- and post-handler have the same function prototype as
the built-in handler. Actually they are called with exactly the same
parameters by the event dispatcher. The prehandler
should return !FL_PREEMPT if the processing by the built-in handler
should continue. A return value of
FL_PREEMPT will
prevent the dispatcher from calling the built-in handler. The post-handler
is free to return anything and the return value is not used. Note that
a post-handler will receive all events even if the object the post-handler
is registered for does not. For example, a post-handler for a box
(a static object that only receives FL_DRAW) receives
all events.
See demo program preemptive.c and xyplotall.c for examples.
Bear in mind that modifying the built-in behavior is in general not a good idea. Using the pre-emptive handler for the purpose of ``peeking", however, is quite legitimate and can be useful in some situations.